Design.Wine.Dine.

  • About
  • Design
    • Interiors
    • Events
    • Floral
  • Wine
    • Cocktails
  • Dine
    • Fall
  • Life
  • Travel
  • Contact
  • Facebook
  • Instagram
  • Pinterest
    • Hello Spring!
    • Fig Season! / 5 Minute Cheese Board
    • Salad Wars – Quinoa Salad
  • Lust List

    August 5, 2014

    Lust-List

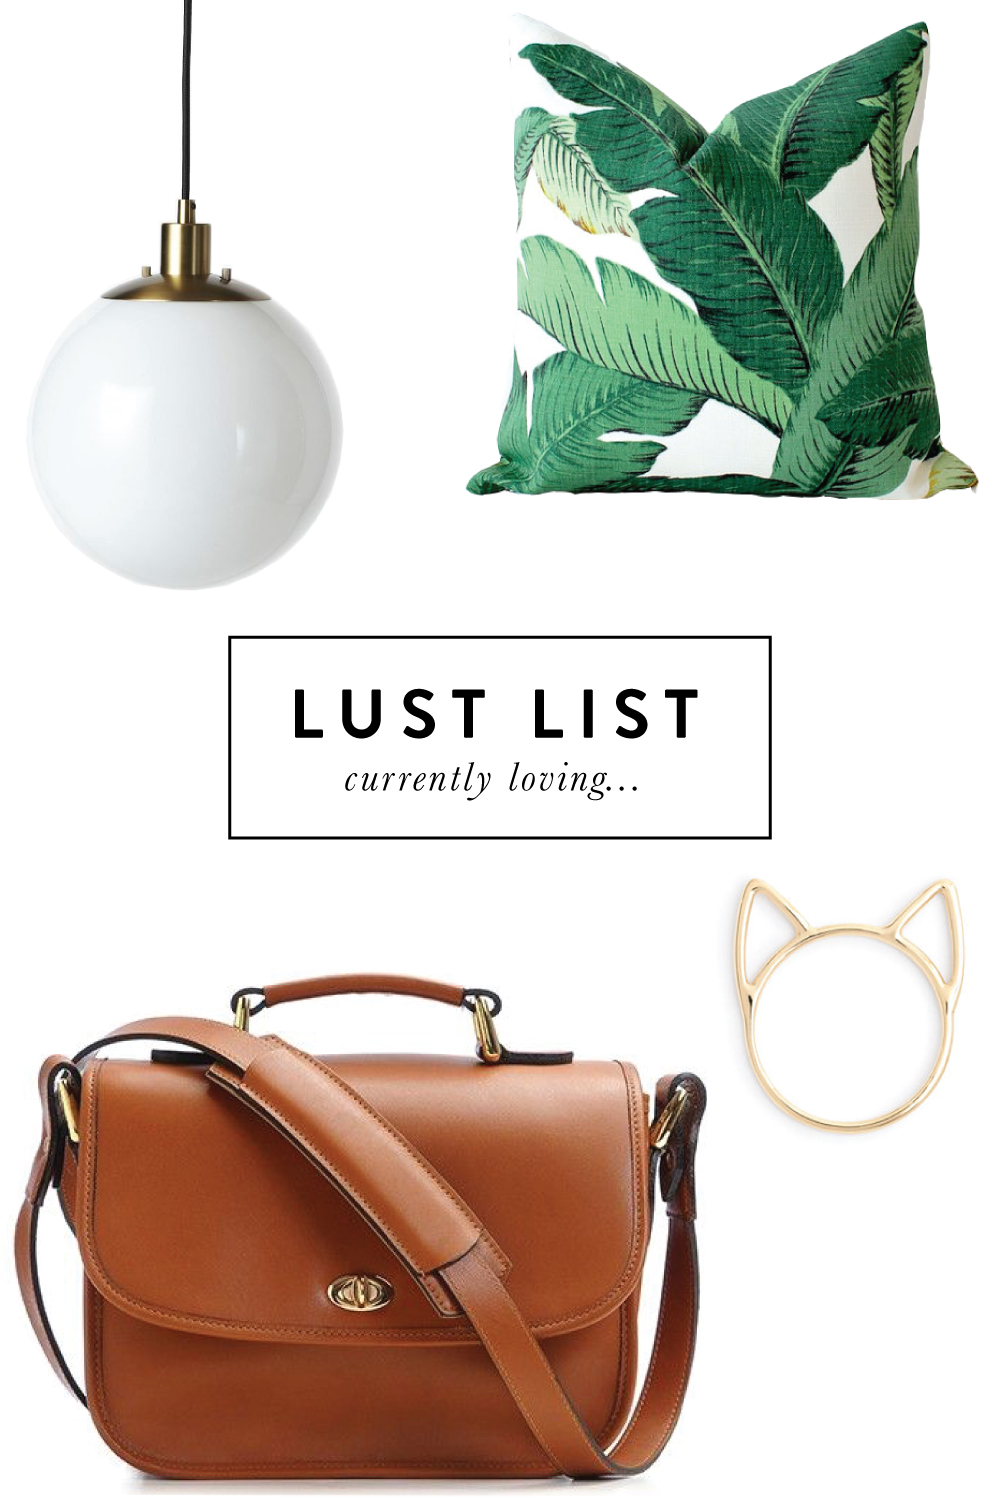
    pendant  |  pillow  |  camera bag  |  meow

    Just a few pretty things that I can’t stop completely obsessing over… hey, a girl can dream – right?  If the pendant were a plug-in, I would have ordered it in a minute for our place.  The milk glass, the touch of brass – love.  I’ve been looking for a little something to hang over our kitchen peninsula and this would be perfect if I didn’t need to hire an electrician to re-wire our rental.  And the highly coveted banana leaf print made famous by the Beverly Hills Hotel has been an absolute favorite for as long as I can remember.  My love was only reaffirmed when I visited the Lombardi House this past weekend and it was absolutely everywhere in the best way possible.  Curtains, chairs, pillows – Heaven!  I would have snapped a few pictures with camera if I had taken it with me, but my camera bag is an absolute embarrassment (which is why I need this ONA bag!) so I left it at home.  Cognac + gold = sold.  Lastly, Catbird is just the best and my inner cat lady almost died when J.Crew announced a collaboration and released their cat ring.  Of course the only size left in stock is my size… I think it’s a sign 🙂

    Hope you’re having a great week!

    Design, Interiors Tagged With: beverly hills hotel, camera, fashion, interior design, interiors, lombardi house, pillows

    TGIF!

    August 1, 2014

    2e6b866b79f845d09a02827e03fbc928

    {Image via}

    Happy Friday!  Is it just me or was this week TOUGH?!  How amazing does that hammock look right now?  Seriously!  We put the final, final, final touches on our 2014-2015 Products and Experiences catalog this week and sent it off to the printer.  Nail biting, nerve wracking, losing sleep wondering if it’s perfect kind of week.  Today, I’ll be accompanying our Creative Director to the printer to do a press check (something I’ve never done in person before) and I’m so excited!  I’m sure I’ll post a picture or two on Instagram, so be sure to follow me over there.  After that, I’ll be wrapping up a few things at the office before heading into the weekend and I’m planning on doing as little as humanly possible on Saturday & Sunday (in between a few tiny projects, of course).  One thing is for certain, I can’t wait to get a good run in and some beach time to enjoy the hot, sunny weather in the South Bay 🙂  Have a great weekend!

    A few links from the week…

    1.  As a former ballet dancer I can NOT stop watching this!

    2.  Dying to try this recipe!

    3.  Maybe Lily would love me more if I made her one of these   =^. .^=

    4.  Interesting article from a human rights worker in Gaza.

    5.  Can’t wait to finally finish this DIY over the weekend.

    6.  Absolutely obsessing over this entryway.

    7.  Love me a great free printable!

    8.  Designing with cats – the prettiest litter box ever!

    Life Tagged With: friday, tgif, weekend

    Peach + Heirloom Tomato Burrata Salad

    July 31, 2014

    Peach Tomato Burrata Salad

    Isn’t summer just the best?  Aside from the hot days and balmy nights, the wide range of produce to choose from at the market is unbeatable.  Peaches are my absolute favorite so when I picked up a few too many, I needed to get creative with my cooking and use them up.  With tons of heirloom tomatoes on hand, I snipped some fresh basil from the garden and got to work.  This salad has easily become one of my absolute favorites and it’s beyond simple to throw together for a quick dinnertime gathering.  Pair it with a crisp Chardonnay or Sauvignon Blanc and your guests will be asking for seconds.  Cheers!

    Ingredients

    6-8 heirloom tomatoes (assorted sizes and colors)
    6 medium/large ripe yellow peaches
    1 cup fresh basil (chopped)
    4 oz. burrata
    2 tablespoons olive oil
    1 tablespoon balsamic vinegar
    salt & pepper to taste

    Directions

    1.  Slice tomatoes and peaches lengthwise into 8 pieces
    2.  Slice basil into ribbons
    3.  Using your fingers, separate burrata into small quarter-size pieces
    4.  Combine peaches, tomatoes and basil.  Drizzle with olive oil and balsamic vinegar and gently toss.
    5.  Place onto plate and add 6-8 pieces of burrata per serving.  Finish with fresh cracked pepper and salt.

    Yield: 6 servings
    Suggested Wine Pairing: Chardonnay or Sauvignon Blanc

    IMG_7663

    IMG_7700

    IMG_7745

    IMG_7829

    IMG_7831

    IMG_7841

    IMG_7917

    IMG_7939

    IMG_7969

    IMG_7849

    Dine, Wine

    #ONEHOPEHoliday / Snippets from last week…

    July 28, 2014

    photo 1

    Happy, happy Monday!  I hope your week is off to a wonderful start!  Last Wednesday we had our “Christmas in July” / ONEHOPE Holiday shoot for ONEHOPE and the days leading up to it were an absolute blur.  From planning to flower arranging and driving all over LA to pick up rentals, it was a chaotic week!  While I’m glad to have the stress of it behind me, seeing everything come together for just the few hours of shooting sometimes doesn’t feel like enough.  Our table scape ended up being so beautiful that I couldn’t bear the thought of tearing it apart for a few days… even if it meant we had some wilted dahlias and crispy ferns as eye sores for Thursday and Friday.  If you follow me on Instagram, I’m sure you’ve already seen a few of these, but I just wanted to pass along some snippets of last week.  Can’t wait to share the professional images (hopefully this week) as well as some of the inspiration behind the day 🙂

    Cheers!

    photo 2

    photo 3

    photo (9)

    photo 4

    Design, Dine, Events, Floral, Wine Tagged With: christmas, decor, design, entertaining, event design, fall, holiday, home, instagram, iphone photos, photo shoot, table scape, thanksgiving, winter

    Inspiring Image

    July 17, 2014

    Screen Shot 2014-07-17 at 11.50.58 AM

    I’ve been super into color lately and I’m trying to do a better job of infusing it into my every day life – particularly my work space.  I’m such a neutrals gal to the core, but there’s something about a pop of color on a pillow or photograph that just brings life to a space.  I found this image floating around the web and was able to track down the photographer.  It just makes me want to travel and explore the world!  Anyway, just thought I’d pass it along in case anyone was looking for a Thursday pick-me-up.  What inspires you?  Xo

    Design, Travel Tagged With: color, inspiration, photography, travel

    Wine Wednesday | Radiant Orchid Granita

    July 16, 2014

    IMG_3474

    Happy #WineWednesday! You know those projects that come across your desk and you just cringe at the thought of having to tackle them?  This one was it for me. I honestly can not remember being so stuck creatively – ever. When Pantone announced its color of the year for 2014, a part of me died inside. To go from Emerald Green (hello, best color EVER), to a bright purple hue inspired by my least favorite flower on the planet, seriously bummed me out. Fast forward a few weeks into 2014 and our PR firm was asking for us to whip up some sort of Radiant Orchid concoction. WHY.

    I spent forever trying to figure out a way to make this happen.  I knew whatever wine we used needed to be virtually colorless (Sparkling) and that there needed to be some sort of mixer that was a borderline unnatural shade of purple to make the entire look come together.  I can’t say I’ve ever tested, tried and mixed so many ingredients in my life to make it happen, but it finally worked and I was floored with the results.  Of course the primary ingredient ended up being one simple, pretty natural thing – Blueberry Lemonade.  Seriously?  After all of that?!

    You know how they say your greatest challenges often wind up being your biggest rewards?  This one was it.  I could not be happier with how it turned out.  Thank you, amazing PR firm for challenging me to think outside of the box… you girls absolutely rock 🙂

    Check out a few of my favorite outtakes from the shoot and the full recipe below.  Cheers!!!

    IMG_3239

    IMG_3314

    IMG_3344

    IMG_3389

    IMG_3395

    IMG_3400

    IMG_3403

    IMG_3405

    IMG_3412

    IMG_3441

    IMG_3447

    IMG_3451

    IMG_3474

    Prep: 5 minutes
    Total time: 3-6 hours

    Serves: 8-10 (depending on glass size)

    Ingredients
    1 (750ml) bottle of ONEHOPE Sparkling Wine
    1 liter blueberry lemonade

    Directions
    1) Pour blueberry lemonade into an 8″ x 8″ glass baking dish and freeze for 1-2 hours.
    2) Carefully remove freezing lemonade from freezer. Using a fork, scrape the mixture until the consistency is slushy throughout (lemonade will be more frozen toward the outside edges of the dish when you start).
    3) Put the mixture back in the freezer for 1-2 hours and repeat two more times. Scraping the mixture prevents it from freezing into a solid brick of ice and maintains the slushy, icy consistency that is so delicious about a granita 🙂
    4) Scoop granita mixture into glasses (we used champagne coups) and top with ONEHOPE Sparkling wine. Cheers!

    Wine Tagged With: bubbly, champagne, color of the year, cooking, design, DIY, foodie, granita, in the kitchen, kitchen, mixologist, mixology, pantone, radiant orchid, recipe, sparkling

    Feeling Blue

    July 8, 2014

    Surfers Manhattan Beach Pier 3

    Surfers Manhattan Beach Pier

    Surfers Manhattan Beach Pier 3

    Surfers Manhattan Beach Pier 2

    Last week was super emotional… To the nth degree.  Over the course of the past 2 weeks, we’ve had some big personal obstacles and I really hadn’t been that down in the dumps in a while.  Do you ever have those weeks when you just feel blue?  Thankfully, the 4th of July rolled around at just the right time and instead of throwing a big bash like we’d originally planned, we opted to spend time together – just the two of us and a few close friends for the fireworks.  It really was all that I needed to feel whole again.

    A few weekends ago, Jake was out of town and I biked up to the Manhattan Beach pier alone.  I parked my bike, grabbed a sandwich at my favorite deli and walked the pier until I could walk no further.  It’s funny and so cliche that some of the simplest things really are what make you the happiest, but that day, I was completely overcome with joy and gratitude.  My heart and soul felt full and I was bursting with sheer bliss.  Some days when we’re doing the daily entrepreneur grind, feeling like we’re scraping by and wondering when we’re ever going to start saving for a house… or a wedding, I forget why we live here.  Days like this day at the Manhattan Beach pier remind me why I moved here and why it’s all worth the wait.

    Here’s to simplifying, getting past the daily noise and filling your life with gratitude.  Hope you’re having a wonderful week!


    Life Tagged With: blue, California, life, nature, ocean, reflection, surf, surfing

    Blair Bear Turns ONE!

    June 30, 2014

    Entryway_Sign

    Happy, happy Monday!  I hope you had a lovely weekend and are ready for the short 4th of July week we have ahead!  Woohoo!

    S0… I’ve been dying to share this party!  It’s as cute as can be and was featured on Style Me Pretty Living – pinch me!   The last time I posted, I ran through the steps to create your own tissue paper fringe backdrop that we used for Blair Bear’s Birthday Bash.  It’s one of my favorite DIY’s to date so if you haven’t checked it out yet, head on over here to see 🙂  Our EVP of Sales at ONEHOPE is a dear friend (you might remember her from here) and just over a year ago, she welcomed the cutest little girl into the world.  Blair seriously has the absolute biggest personality and I could not wait to help her momma out with her first birthday party.  Tiffany found a Panda Bear print that she loved at the Land of Nod, so we used that for inspiration for the color palate (mint, coral, pink, gold and white) and went from there.  AND, since it happened to be around the same time we were launching our ONEHOPE Mimosa Bar, we decided to use it that day for the adults and set up an almost identical version (minus the bubbly of course) for the little ones.  We created the tissue paper fringe backdrop for the Mimosa Bar and a fun tissue paper pouf version for the juice bar 🙂  In all, we had so much fun putting this together and not a single detail was overlooked.  Check it out and view all of the vendors at the end!  Xo

    PS: The Mimosa Bar + Bubbly for the party provided over 50 meals to children fighting hunger.  Cheers to that!

    Entryway_Details2 2

    Entryway_Details

    Entryway_Gifts

    Entryway_Gifts2

    Inside_Family

    {The happy family! Yay to turning ONE!}
    Inside_Details

    Mimosa_Bar1

    {The ONEHOPE Mimosa Bar in use with our hand crafted tissue paper fringe backdrop}Mimosa_Bar1

    Mimosa_Bar2

    Mimosa_Bar3

    Mimosas

    Mimosas2

    Mimosas2

    Mimosas3

    Mimosas4

    {Every case of ONEHOPE’s Sparkling wine provides 25 meals to children fighting hunger – so perfect for the adults to enjoy during a kid’s party}

    Mimosas6

    {Guests mixed and muddled their own mimosas with fruits and juices they loved}
    Mimosas7

    Mimosas9

    Inside_Family2

    {BFF mommas with their BFF babes}Mimosa_Bar_Signage-Detail

    Mimosa_Bar_Details

    Mimosa_Bar_Straws

    Entryway_Details2

    Florals

    {Florals were a mixture of peach garden roses, bright pink ranunculus and tulips, and dusty miller}Lantern_Lights_Outside

    Lantern_Lights_Outside2

    Outside_Details_Juice_Bar4

    {The juice and snack bar area was a replica of the adult’s Mimosa Bar (minus the champagne).  Kids were able to mix their own fruit juices and grab their favorite sweets and snacks}Outside_Details_Juice_Bar5

    Outside_Details_Juice_Bar

    Outside_Details_Juice_Bar2

    Outside_Details_Juice_Bar3

    Outside_Details_Juicebar4

    Outside_Details_Juicebar5

    Outside_Detail_Juice

    Outside_Details_Juice

    Outside_Details_Juice2

    Outside_Details_Juicebar6

    Outside_Details_Snacks

    Outside_Details_Cookies

    Outside_Details_Blair

    Outside_Details_Blair2

    Outside_Details_Blair3

    Cake_Table

    Cake_Table_Cookies

    Cake_Table_Details

    Cake_Table_Cake

    Kitchen_Pictures

    {Twelve months of Blair Bear!}Kitchen_Pictures2

    Cake_Smash

    Cake_Smash2

    {YAY!  You’re ONE!!!}Cake_Smash3

    Cake_Smash4

    Cake_Smash5

    {Oh so thirsty!  Birthdays are hard work :-)}

    Inside_Family3

    {The girls behind the scenes –  Me, Beth, Tiffany and Sabrina}
    Vendors/Sources
    Mimosa Bar – ONEHOPE Wine
    Sparkling – ONEHOPE Wine
    Event Design and Florals –
    Invitations – Five Two Eight 
    Photography – Kylie Chevalier
    Desserts – Take Two Etc.
    Tissue Paper for fringe, garlands and poms – Koyal
    Lanterns – Koyal
    Linens – La Tavola

    Events, Wine Tagged With: baby, birthday party, bubbly, decor, entertaining, food, kids party, mimosa, mimosa bar, outdoor entertaining, pink, wine

    DIY Fringe Backdrop

    June 18, 2014

    Mix&Muddle-12

    I LOVE a solid DIY with pretty turn-key results and this one is just that!  When our EVP of Sales, Tiffany, asked for my help throwing her adorable little girl’s 1st birthday party, I knew we were going to have some fun 🙂  This was the perfect opportunity for us to debut our Mimosa Bar set (Shhh! Details coming soon!) and I was dying to create a cool backdrop that we could shoot everything up against.  This entire project took about 3 hours from Home Depot run to finish so I’m thrilled with what we were able to create in such a short amount of time.

    Fringe-Backdrop-DIY

    Supplies

    Tissue paper in assorted colors
    Panel Board
    2- 2×4’s (8ft.)
    Drill
    Screws + Bolts (I used 2″)
    Staple Gun + Staples (light duty)
    Measuring tape
    Paper chopper

    Instructions

    Before you begin your backdrop, determine how large it needs to be.  We wanted ours to be 8′ tall and to line up with the entire width of Tiffany’s buffet table (~60″).  Knowing that, I purchased 2 pieces of panel board (as one wouldn’t be big enough to cover the entire surface area between the top of the 8′ 2×4’s and the top of her buffet (~5′-6″).  I had the panel board cut to size at Home Depot and we were ready to go!

    1.  Once your supplies are home, lay out the panel board and the 2×4’s and make sure the panel board is square with the legs.

    2.  Drill large enough holes through the 2×4’s and into the panel board for your screws to slip into, but don’t attach the legs yet (that will be your last step).

    3.  Remove the legs from your workspace to get them out of the way and determine how thick you want each row of fringe to be.  We decided that we wanted each layer of fringe to be about 8″ tall which perfectly worked out to be 1 piece of tissue paper folded long ways (hotdog style).  We didn’t want to be able to see the wood panel board when the fringe blew, so we layered each row first.  Starting at the BOTTOM of your board, fold 1 piece of tissue paper in half (so that you have two layers and staple it in place).  It might take 2-3 pieces of tissue to make it all the way across your panel board.  Don’t worry about the seams – no one will ever see them once you have covered up this layer with fringe 🙂

    4.  Create your fringe layer and apply.  To create the fringe, we took 2 sheets of tissue paper, folded them hotdog style (so that we had 4 layers of tissue) and using the paper chopper, we sliced the paper in 1″ sections.  Be sure to stop slicing about 1-2″ from the crease.   This was the most time intensive part of the project.  However, using a paper chopper will make the process so much faster and will make your fringe even and much more professional looking 😉  Apply your fringe with a staple gun (across the top along the crease) and repeat all the way across.

    5.  Once you have applied your first row of fringe, repeat steps 3 and 4.  Just a little tip… we thought it looked best if we covered up the top inch or so of the previous layer of fringe with our next color of tissue (see picture for detail).  That way, the transitions aren’t so harsh between colors and you cover up any inconsistencies along the top (below the crease) with the cuts you did to create the fringe.

    6.  When you’re ready, carefully stand your panel board up with another person.  Be careful not to step on any fringe… it will tear off SO easily!  It might be easiest to lift your board slightly and slide the legs underneath to attach them.  Either way, just be careful not to tear or crease any of your pretty fringe.

    Put your backdrop into place and….voila!!!  I can’t wait to share the images from the full party!  We were covered by Style Me Pretty Living and the feature is the absolute cutest!

    PS:  The Mimosa Bar in the pictures can be purchased here, but more on that later too 🙂  xo

    Mix&Muddle-17


    Events Tagged With: birthday party, color, decor, design, event design, events, fringe, home, pink

    A Sangria Summer

    June 17, 2014

    Sangria_Feature

    One of my biggest jobs for ONEHOPE in addition to overseeing all of our Art Direction is Product Development.  Long story short, my job is a lot of trend spotting and then creating gift packages and products that are beautifully crafted, unique, super high quality and that give back to a wide range of causes.  After seeing the Mimosa Bar concept pop up a few times on the internet, I reached out to Bri Emery over at Design Love Fest to see if she would be interested in collaborating on a Mimosa Bar for one of her many ridiculously amazing floral workshops and she took us up on the offer.  We put together this mimosa bar and once the pictures hit the web, our set-up became the #1 pinned mimosa bar on the internet almost instantaneously in addition to garnering a few thousand likes within a matter of an hour.  I knew we had caught on to something.  After a bunch of sourcing, back and forth with our operations team, mind numbing numbers conversations (I’m a creative person, y’all!), and maybe a few tears, we finally launched our Mimosa Bar in April and officially became the first wine company to offer such a full service (and amazing!!!) package.

    Fast forward to late April and while brainstorming fun ideas for Cinco de Mayo and summer, it hit me.  Why not use the Mimosa Bar as a Sangria Bar?!  I LOVE me some summer sangria and is there anything better in the summer?  Additionally, what a cool way to reuse all of the juice carafes and bowls that already come with the Mimosa Bar!  A day or so later, we mixed up a bunch of  different sangria recipes (that I’ve been sharing here) and shot our “Sangria Bar” as something fun for summer entertaining.

    I figured if you’re a sangria junkie like me, it might be easiest to house everything in one place so they’re easy to find 🙂 All of the recipe links are below!  Cheers to kicking off summer the right way!  Xo

    Sangria_Summer

    Sangria_Spread

    Blood Orange Sangria

    Guava + Sage Sangria

    Blackberry Orange Sangria

    Grapefruit Sangria

    White Peach Sangria

    Tropical Sangria


    Wine

    • « Previous Page
    • 1
    • …
    • 7
    • 8
    • 9
    • 10
    • 11
    • …
    • 22
    • Next Page »
    • Facebook
    • Instagram
    • Pinterest

    Search

    About Meg

    subscribe via email

    Insta Love

    Shop Pillows!

    Recent

    • Late Summer Gazpacho
    • 2018 Harvest Party
    • Life Lately: Golden Hour
    • Sauvignon Blanc Harvest / 2017
    • Fig + Prosciutto Salad with Almond Milk Ricotta

    Favorites

    Follow Along!

    • Facebook
    • Instagram
    • Pinterest

    © Copyright 2025. Design.Wine.Dine.. All Rights Reserved. Design by Bloom.