Design.Wine.Dine.

  • About
  • Design
    • Interiors
    • Events
    • Floral
  • Wine
    • Cocktails
  • Dine
    • Fall
  • Life
  • Travel
  • Contact
  • Facebook
  • Instagram
  • Pinterest

ONEHOPE Holiday Party

January 8, 2014

Decor J Wiley Photography ONEHOPE -1014

Helloooo!  Are you staying warm out there?!  I can not believe the news coming out of the midwest and east coast!  I’m slightly jealous that I’m not there to witness the biggest snow storm in DECADES (my inner 10 year old self would do anything for a snow day), but I’m also thrilled at the fact that I’m not there to experience the super cold temperatures.  I think the lowest I’ve experienced is a wind chill of 18 below and I never want to face that again.  I feel you, ‘Merica!  Stay warm!

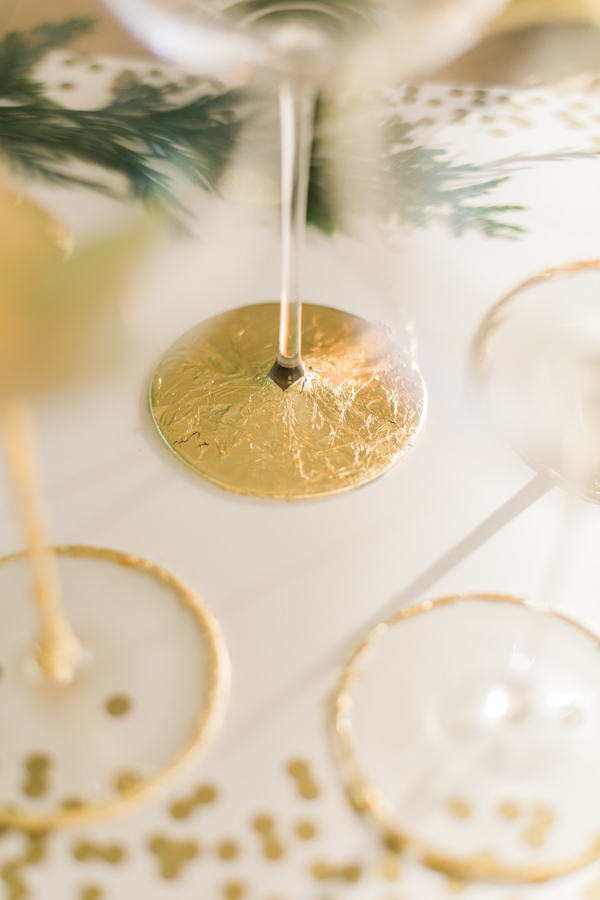
I REALLY wanted to share all of our ONEHOPE Holiday (#ONEHOPEHoliday) images before Christmas for anyone searching for last minute inspiration, but as I detailed previously, that just couldn’t happen this year.  Since half of the country is facing winter to the max, I thought I’d still share this little winter wonderland transformed office conference room in case you’re planning a snowy get-together.  The second half of the images are of the DIY we did that day where we gold-leafed our own glassware.  It was really fun and the results were so unique and gorgeous… definitely something creative and different to do with your girlfriends if you ever feel like having a ladies night in 🙂  I apologize in advance for there being tons of pictures, but I just could not narrow them down further.  We had an absolutely amazing photographer, Jen Wiley who crushed it for us.  I usually shoot most of our content, but knew that we needed a professional for a project of this magnitude and Jen was SO nice, so receptive, so creative… I could not have asked for anyone better.  She captured the day perfectly and didn’t miss a SINGLE detail.  If you’re on the market for a wonderful photographer, hire her. Now 🙂

PS:  If you’re new to Design Wine Dine and are interested in the background story of why I planned this little holiday get-together, check out my reasoning and inspiration board for the party and decor here.  Also, I had this crazy vision in my mind that included a pallet wall, but we didn’t have one at our office… so I made one.  Unfortunately, I was in such a rush to get it done that I didn’t document a lot of the process, but will break it down step by step and put it up here soon.  Stay tuned!

Decor J Wiley Photography ONEHOPE -1010

Decor J Wiley Photography ONEHOPE -1001

Decor J Wiley Photography ONEHOPE -1002

Decor J Wiley Photography ONEHOPE -1003

Decor J Wiley Photography ONEHOPE -1005

Decor J Wiley Photography ONEHOPE -1006

Decor J Wiley Photography ONEHOPE -1007

Decor J Wiley Photography ONEHOPE -1009

Decor J Wiley Photography ONEHOPE -1011

Decor J Wiley Photography ONEHOPE -1012

Decor J Wiley Photography ONEHOPE -1013

Decor J Wiley Photography ONEHOPE -1014

Decor J Wiley Photography ONEHOPE -1015

Decor J Wiley Photography ONEHOPE -1016

Decor J Wiley Photography ONEHOPE -1017

Decor J Wiley Photography ONEHOPE -1020

Decor J Wiley Photography ONEHOPE -1022

Decor J Wiley Photography ONEHOPE -1023

Decor J Wiley Photography ONEHOPE -1026

Decor J Wiley Photography ONEHOPE -1027

Decor J Wiley Photography ONEHOPE -1028

Decor J Wiley Photography ONEHOPE -1028-2

Decor J Wiley Photography ONEHOPE -1030

Decor J Wiley Photography ONEHOPE -1031

Decor J Wiley Photography ONEHOPE -1032

Decor J Wiley Photography ONEHOPE -1033

Decor J Wiley Photography ONEHOPE -1039

Decor J Wiley Photography ONEHOPE -1046

Decor J Wiley Photography ONEHOPE -1047

Decor J Wiley Photography ONEHOPE -1048

Decor J Wiley Photography ONEHOPE -1049

Decor J Wiley Photography ONEHOPE -1053

Decor J Wiley Photography ONEHOPE -1057

Decor J Wiley Photography ONEHOPE -1059

Decor J Wiley Photography ONEHOPE -1061

Decor J Wiley Photography ONEHOPE -1065

Decor J Wiley Photography ONEHOPE -1066

Decor J Wiley Photography ONEHOPE -1067

Decor J Wiley Photography ONEHOPE -1068

DIY Information

Supplies

  • Flutes or Champagne Coups – We used these and these to give our guests a little variety.
  • Gold leaf, adhesive and sealant (available at craft stores)
  • Paint brushes

Directions

  • Using a paint brush, apply adhesive to the glass.  Get creative with shapes and stripes!
  • Wait a few minutes until the glue gets tacky (2-5 minutes).  We had the best luck when the glue was almost dry.
  • Place your gold leaf on the glass and press down to smooth out any bubbles or inconsistencies.  Allow your gold leaf to set for 15-20 minutes.
  • Carefully remove excess gold leaf from around the glued areas.
  • Once all excess gold leaf is removed, brush your sealant on over the gold leaf.  This will allow you to drink out of and handle the glasses.  Since your glasses are hand crafted with love, please hand wash them with care

DIY J Wiley Photography ONEHOPE -2003

DIY J Wiley Photography ONEHOPE -2005

DIY J Wiley Photography ONEHOPE -2008

DIY J Wiley Photography ONEHOPE -2009

DIY J Wiley Photography ONEHOPE -2010

DIY J Wiley Photography ONEHOPE -2011

DIY J Wiley Photography ONEHOPE -2012

DIY J Wiley Photography ONEHOPE -2014

DIY J Wiley Photography ONEHOPE -2015

DIY J Wiley Photography ONEHOPE -2016

DIY J Wiley Photography ONEHOPE -2017

DIY J Wiley Photography ONEHOPE -2018

DIY J Wiley Photography ONEHOPE -2019

DIY J Wiley Photography ONEHOPE -2022

DIY J Wiley Photography ONEHOPE -2023

DIY J Wiley Photography ONEHOPE -2024

DIY J Wiley Photography ONEHOPE -2026

DIY J Wiley Photography ONEHOPE -2027

DIY J Wiley Photography ONEHOPE -2028

DIY J Wiley Photography ONEHOPE -2030

DIY J Wiley Photography ONEHOPE -2031

DIY J Wiley Photography ONEHOPE -2032

DIY J Wiley Photography ONEHOPE -2033

DIY J Wiley Photography ONEHOPE -2033-2

DIY J Wiley Photography ONEHOPE -2037

DIY J Wiley Photography ONEHOPE -2038

DIY J Wiley Photography ONEHOPE -2039

DIY J Wiley Photography ONEHOPE -2040

DIY J Wiley Photography ONEHOPE -2041

DIY J Wiley Photography ONEHOPE -2042

DIY J Wiley Photography ONEHOPE -2043

DIY J Wiley Photography ONEHOPE -2044

DIY J Wiley Photography ONEHOPE -2047

DIY J Wiley Photography ONEHOPE -2048

DIY J Wiley Photography ONEHOPE -2049

DIY J Wiley Photography ONEHOPE -2050

DIY J Wiley Photography ONEHOPE -2051

DIY J Wiley Photography ONEHOPE -2052

DIY J Wiley Photography ONEHOPE -2053

DIY J Wiley Photography ONEHOPE -2054

Wine: Hope at Home
Coffee: ONEHOPE Coffee
Linens: La Tavola
Gold rimmed glasses and ghost chairs: Classic Party Rentals
Deer Head: ZGallerie 
Frames: West Elm
Event/Floral Design and Production: Me!
Calligraphy: Beth Phillips at ONEHOPE
Photography: JWiley Photography

Design, Dine, Interiors, Wine Tagged With: christmas, DIY, gold, gold leaf, holidays, tutorial

Weekend Project – Patio Garden

October 25, 2013

Last weekend, after returning home from New York, I was really adamant to finish something.  I’ve got a list of DIYs coming out of my ears, but really wanted to get one done, on the books and out-of-the-way.  Enter… our outdoor space.  When viewing our place for the first time, I was THRILLED when I stepped outside and my question of “oh, so this is a shared space?” was answered with “no, this would be all yours”.  Literally, you guys.  I was shaking with excitement.  I couldn’t get Jake on the phone fast enough.  I am obsessed with gardening (thanks to my mom for that gene) and I take no shame in enlisting friends to care for my little green kids as much as they do for Lily whenever I’m away.  Having a space that was so much bigger than ever before to create my own little garden by the beach?!  YES please.  Thankfully, after borderline stalking our now landlord, we got the apartment and I couldn’t wait to go to town.  We have a patio directly off of our bedroom as well as yard (glorified patio – not pictured) up some steps and behind our duplex.  Sold.  However, said patio was hideous when we moved in. HID.E.OUS.  Enter exhibit A:

IMG_0204

I told you.  Steps that needed to be stained, some RANDOM paint job going on there with a mixture of white and beige… But she had potential!  It was SPACE.  Real, live outdoor space of our very own that could be transformed into whatever we’d like.  The first thing on the list was to figure out what in the heck to do with the cinderblock walls.  Paint them?  Ideally, I wanted it to be a living wall to wake up next to (all Cameron Diaz like in The Holiday with electronic blinds that open with the sun shining in), but that seemed like a pretty lofty goal for a rental.  So, we needed to think of something else.  While running into Ikea one day for heavens knows what, I stumbled across the Applaro Outdoor Panel and knew I’d found a solution.  I figured out how many we’d need, bought them and since we got carried away with unpacking, traveling for work and life in general, there they sat until last weekend.  And then, finally came my little garden.

If you’re in a situation like us, here is what you need to create your OWN apartment garden with roughly $150.

Supplies

Ikea Applaro Outdoor Panel – Pot hooks included (3) $39
Ikea Socker pots (8) $0.79
Ikea white pots (2) $10.99 (no longer available online, but next size up here)
Masonry anchors + Bit $7
Total: $152.30

I already had most of the plants and the lanterns, as well as a drill and a level to make this all come to life, but factor in another $100 if you’re starting fresh.

Step 1: Hardware – I knew I was going to need a masonry bit as well as concrete anchors so I was able to find a package that included both the anchors and the right size bit to drill pilot holes for the anchors.  I bought some longer anchors too just in case the 1.25″ anchors were too short so that I wouldn’t have to run back out to the hardware store.

IMG_0208

Step 2: Place wall panels where you want them and make sure they’re level.  Since I was doing this by myself and since the panels were going to be resting on uneven brick pavers, this was honestly the hardest part.

IMG_0210

Step 3: Drill your pilot holes and screw in anchors to attach your panel.  This is pretty self-explanatory, but just make sure that you stop every once in a while to give your drill a rest.  I have a pretty inexpensive drill and while it’s amazing for the price, drilling through concrete/cinderblock is entirely different from wood or anything else I’ve ever done in the past.  And for the love of god, be CAREFUL when removing your bit.  It was SO hot from the friction and of course I wasn’t wearing gloves (idiot) and burned my fingers.  I’m fine, but that was no fun.

IMG_0213

Repeat until all panels are attached!  YAY!  Minus all of the crap to the left, the space is already starting to look so much better!  Now, time for the pots.  I decided to use the Socker pots from Ikea because a) they’re inexpensive b) they’re cute and c) they’re the perfect size for herbs and that is what was going in them.  However, they don’t have holes in the bottom for drainage or for hanging them on the hooks so you have to drill those manually.  Just make sure you use a bit suitable for metal.

IMG_0215

Step 4: Put your little plants in the pots and hang on your wall!  You’re almost done!

IMG_0217

Step 5: Dress up the weird empty bottom area without rungs with plants, lanterns, candles, pumpkins if it’s October… get creative!  Or, if you have the space, Ikea sells a storage bench that can attach to the wall panels.

IMG_0221

Tadaaaa!  I still need to re-pot the larger rosemary plant as well as the olive tree AND re-stain those darn steps, but I think she’s looking pretty cute for just a few hours of work.

And for good time’s sake… before and after!

Before After Garden

Design, Floral, Interiors Tagged With: apartment, DIY, garden, gardening, home, house, Ikea, life, living, outdoor space, tutorial

NYC Design High

November 8, 2012

Before 2011, I had never been to New York which seems crazy to me now that I’ve been fortunate to have ventured there a few times since… AND LOVE IT!  From the architecture to the hustle and bustle to the food and the people – nothing compares to it.  There is something new around every corner and I always leave heartbroken that I have to go home so soon.  On a recent visit, a friend of mine took me on a tour around ABC Carpet & Home and I about died.  GAH!  I could go on and on about how obsessed I was with everything in sight, but I’ll spare you from my design high rant and just show you the pictures instead 🙂

In the aftermath of Hurricane Sandy, it absolutely pains me to think of so much of that city under water and the number of people left to start over from scratch.  A few of my favorite artists and designers are doing everything in their power to help.  Be sure to take a look below.  

{Mercury glass!}

{Clearly I was too excited about this mercury glass explosion to take a straight photo.  Love.}

{Blue and green heaven}

{These were actually ceramic even though they look like recycled aluminum cans.  I feel a DIY project coming on!}

{So much inspiration!  Future kitchen cabinet and bookshelf ideas}

{Intricate, hand blown tumblers and flutes}

{I could have taken this entire tray!}

{I’m sorry… but original chevron flooring?!  Please come home with me}

{Industrial pendants}

{Vintage window pane room partitions.  Aaaamazing idea}

{Gorgeous table}

{Recycled glass bottles for days}

{Rifle Paper Company notebooks.  I’ll take seven.  Thanks}

{Cordials that reminded me of my Grandma’s}

{Yes!}

{Ohhh just my favorite Madeline Weinrib rug IN LIFE}

{This makes me want to change my color scheme 😉 }

{And this makes me want to keep my color scheme and just buy all new rugs}

Hurricane Sandy Relief

The proceeds from this gorgeous Caitlin McGauley print are being donated to the American Red Cross to help the Hurricane Sandy relief effort.  I absolutely adore her work.

I love this bag from Wedding Chicks!  100% of proceeds are donated to the American Red Cross.

If you would just like to make a donation, please do so here.  Any amount will help.

Design, Interiors Tagged With: abc carpet and home, cocktail, design, DIY, interior design, mercury glass, New york, pillow, rug, sofa

Grace Bonney on The Nate Berkus Show

October 13, 2011

If you know design, you know Design*Sponge.  DS has been a go-to of mine for inspiration for years and I was thrilled to hear that Grace Bonney was going to be featured on The Nate Berkus Show today.  I LOVE her DIY projects and today, in true Grace Bonney form, they were not only incredibly chic and creative, but also very affordable.  My favorite had to be the $75 bright blue door dining table…  gah!  I’ve been dying to create my own refurbished door dining table, but our little loft is simply too small for that large of a piece.  Ahhh well… it shall have to wait for our next place, but I’ll be keeping this in my back pocket for when the time is right.  Click here to watch the full video and if you haven’t already picked up a copy of Design*Sponge at Home, you really should… I read it cover to cover on my flight home from Austin and can’t wait for (hopefully) a second 🙂

Design, Interiors Tagged With: DIY, interior design, nate berkus

Chalkboard Paint

August 2, 2011

I have a confession.  I have spent a serious amount of time daydreaming about which of my kitchen walls to paint with Benjamin Moore’s Chalkboard Paint.  Being that we’re renters, I’ve ruled this urge out time and time again, but it’s always tempting me and saved in the back of my mind for when we are hopefully owners one day.  When a reader messaged me about the chalkboard in the background of one of my photos seen here, I figured it was time that I reveal my chalkboard paint obsession with the world.

As I was gearing up for an afternoon of entertaining, I scoured the internet for a chalkboard that could fit above our wine cabinet/buffet that would serve as a menu for our guests.  Whatever I found was either entirely too large or much too expensive so I opted to make my own (similar to the bulletin board shown here – thanks again student budget!).

{I had a picture frame that I wasn’t using so I removed the mat and glass, purchased a piece of panel board from Home Depot for $4, had it cut there to the size I needed and painted it with Benjamin Moore’s Chalkboard Paint – about $15/quart}

{I hung the finished product over our buffet as a menu and it serves as a space for inspirational quotes when we aren’t entertaining}

{Chalk Ink is AMAZING.  It’s about $7/4 pack at any arts and crafts store, writes like a marker and looks like chalk without the dust or mess}

{I was on a Chalk Ink kick so I finally labeled my garden markers}

Design, Interiors Tagged With: chalkboard, chalkboard paint, design, DIY

Bulletin Board DIY

July 21, 2011

When my boyfriend and I were looking at apartments (almost a year ago – time flies!), both a beach side location and a spare bedroom/office were at the top of our list.  Being that we were on an entrepreneur’s/student’s budget, the first prevailed when we found a rare bright and airy loft in the South Bay without an extra room to call an office.  As a person currently juggling several projects, I think it’s imperative to be organized.  And as a designer, I’m always looking at aesthetically pleasing, inspirational and functional organization materials.  I’ve been eying this bulletin board for a while now to serve as an inspiration board next to my desk, but the two size options didn’t quite work with the wall space that I have (and I’m not paying that kind of  price for a bulletin board).  I decided to take a shot at making my own instead (using this economical alternative) and to my surprise, it turned out just lovely.  I can’t wait to hang it on our wall!

Being that I didn’t want the existing wood frame, I removed it using a hammer and screw driver to separate it at the corners.  I ironed the fabric (oatmeal denim from JoAnn’s) pulled it tight and used a staple gun to hold it in place.

It was important to me that the visible grain of the fabric be perfectly horizontal and vertical on the front so while the fabric looks unevenly applied on the back, it looks great from the front.

Front of the bulletin board once the fabric has been applied.

Next I applied antique gold upholstery nail head detailing around the border to give it a finished and decorative look.  I spaced them 2″ apart and they were $1.99/24 pack at JoAnn’s.

Voila!

And all for under $20!

Design, Interiors Tagged With: Bulletin board, design, DIY

  • « Previous Page
  • 1
  • 2
  • Facebook
  • Instagram
  • Pinterest

Search

About Meg

subscribe via email

Insta Love

Shop Pillows!

Recent

  • Late Summer Gazpacho
  • 2018 Harvest Party
  • Life Lately: Golden Hour
  • Sauvignon Blanc Harvest / 2017
  • Fig + Prosciutto Salad with Almond Milk Ricotta

Favorites

Follow Along!

  • Facebook
  • Instagram
  • Pinterest

© Copyright 2025. Design.Wine.Dine.. All Rights Reserved. Design by Bloom.