Design.Wine.Dine.

  • About
  • Design
    • Interiors
    • Events
    • Floral
  • Wine
    • Cocktails
  • Dine
    • Fall
  • Life
  • Travel
  • Contact
  • Facebook
  • Instagram
  • Pinterest

What’s In My Bag – Europe Edition

May 18, 2016

f2 preset

Before Jake and I even found our house in December, he had booked us a surprise trip to Europe for our combination Christmas + Birthday present that has become an annual tradition.  We’re both so passionate about traveling and exploring the world and value experiences more than things so we pool together what we would generally budget for Christmas, birthdays and travel and try to take one big trip per year.  With a 2 week trip planned for mid April, we had just under 6 weeks to move and get settled before taking off for Greece and Italy.  Basically, the week before our trip was a total scramble to organize, finish up a few loose ends at work and figure out what the heck I needed to bring with me to Europe.

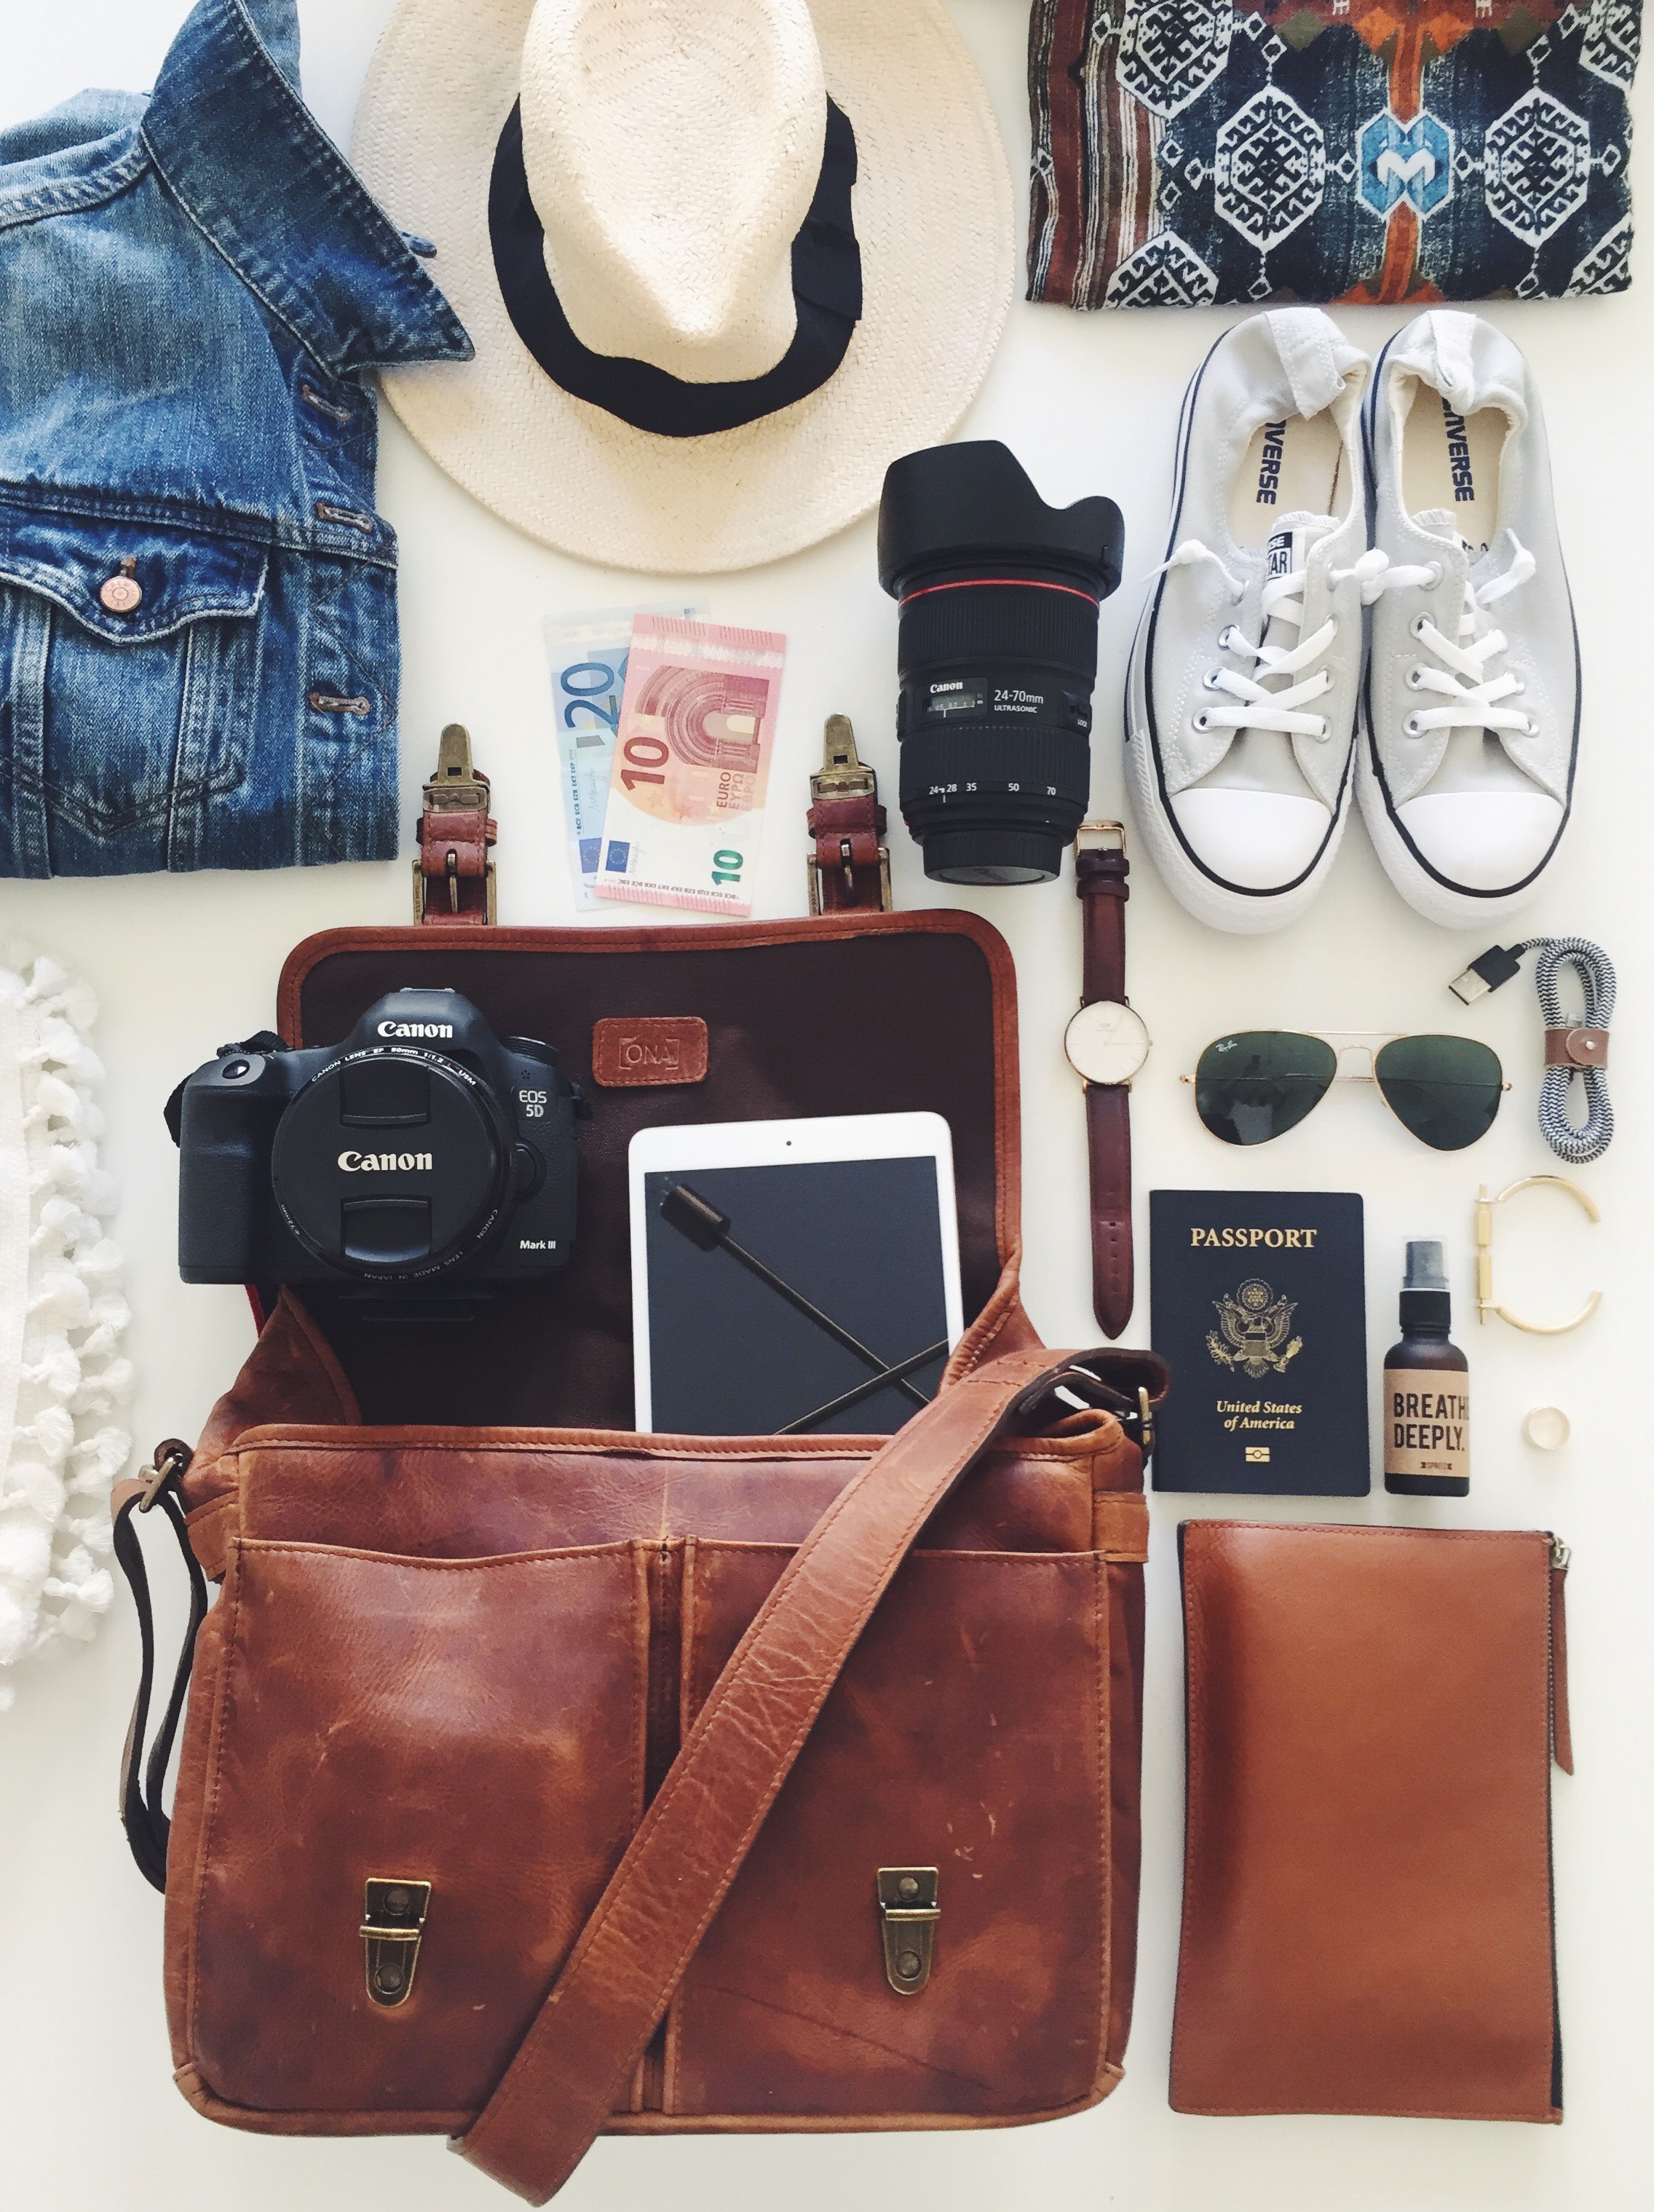
I’d recently upgraded my camera for work and it no longer fit in my old bag so I’d had my eye on this replacement for a while.  When my mom sent me money to put towards it for my birthday, I was ecstatic and couldn’t wait for it to show up on our doorstep – I knew it would be perfect for not only keeping my camera safe, but also for holding all of the necessities while abroad.  When traveling, it’s so important to keep things light, versatile, organized and easily accessible (to you only) so this job did the trick. A large back pocket was perfect for storing my clutch/wallet, the large padded interior pocket was perfect for keeping my iPad safe, and the front two pockets were the perfect size for a charger, extra memory cards, passport, lipstick, etc. Before we left for the airport, I snapped a pic of what was in my bag – all of the essentials I’d need to have handy while traveling through Europe. Click through below to shop!

Life, Travel Tagged With: europe, fashion, leather, purse, summer fashion, travel, wanderlust, watch

Lust List

September 10, 2014

Lust-List2

suede booties  |  lamp  |  sunnies  |  earrings  |  ring  |  watch  |  pillow

Anyone else feeling totally in limbo this week?  A huge part of me is craving fall while the climate in LA says “hail no!” and won’t give us a break.  Here are a few of my favorite things currently that are perfect for late summer/early fall.

Last year I had a cheapo pair of booties that fell apart to pieces halfway through the season.  I’ve had my eyes on these since last year and I’m saving my pennies to finally purchase a pair I know I’ll love.  And this lamp?!  Every once in a while, Ikea just nails it.  This year they blew me out of the water with this insane collection of lighting.  Sure the “brass” isn’t real, but I’m loving the attention to detail in the white + “brass” + black and white zig zag cloth cord.  Fab.  When I finally had to retire my last pair of Ray Bans, I went back and forth on whether or not to splurge and have a little fun with the mirrored lenses.  I ultimately went classic and a piece of me wishes I would have gone bold.  Loving these.  And while we’re accessorizing, who doesn’t need another pair of casual earrings and an every day ring?  Madewell always has the absolute best, budget friendly jewelry that always holds up.  I’ve been eyeing this watch for freaking days since I discovered Daniel Wellington on Instagram and I’m hooked.  I’ve been checking back weekly to see if they start offering it in plain yellow gold, but it’s an awesome option for all rose gold lovers.  Lastly, I have no words for my love of this pillow and pretty much anything else from Shoppe.  I’ll take one or two of these please!  A girl can dream, right?

PS: Happy Wine Wednesday!  What’s in your glass tonight?  xo

Design, Interiors, Life Tagged With: fall, fashion, Ikea, jewelry, late summer, lust list, mbfw, nyfw, pillow, ray bans, style, summer, watch

Lust List

August 5, 2014

Lust-List

pendant  |  pillow  |  camera bag  |  meow

Just a few pretty things that I can’t stop completely obsessing over… hey, a girl can dream – right?  If the pendant were a plug-in, I would have ordered it in a minute for our place.  The milk glass, the touch of brass – love.  I’ve been looking for a little something to hang over our kitchen peninsula and this would be perfect if I didn’t need to hire an electrician to re-wire our rental.  And the highly coveted banana leaf print made famous by the Beverly Hills Hotel has been an absolute favorite for as long as I can remember.  My love was only reaffirmed when I visited the Lombardi House this past weekend and it was absolutely everywhere in the best way possible.  Curtains, chairs, pillows – Heaven!  I would have snapped a few pictures with camera if I had taken it with me, but my camera bag is an absolute embarrassment (which is why I need this ONA bag!) so I left it at home.  Cognac + gold = sold.  Lastly, Catbird is just the best and my inner cat lady almost died when J.Crew announced a collaboration and released their cat ring.  Of course the only size left in stock is my size… I think it’s a sign 🙂

Hope you’re having a great week!

Design, Interiors Tagged With: beverly hills hotel, camera, fashion, interior design, interiors, lombardi house, pillows

The Hardest Thing I’ve Ever Done In My Life: Paint Walls Black

November 28, 2012

No joke, people!  Painting walls black should be left strictly to the professionals 😉 But being that I had a budget for paint, supplies and nothing beyond that, I had to make do and painted our office black myself.  If you are going to embark on such a task, here are a few tips to follow (please feel free to comment with any others you might have).

  1. First and foremost, reconsider doing this yourself.  Sorry, but I have to say it.  Unless you are one of the few who find taping off a wall, painting and then repainting at least 1-3 more times therapeutic in some way, really reevaluate your budget and see if there is room to hire a painter.  You will not regret it.
  2. If you decide to move forward, buy only the best paint and supplies.  This is an absolute MUST.  Buy only the best grade of paint.  In my case it was Aura by Benjamin Moore (~$60/gallon) and thank GOD I went with this one (more on that later).  Additionally, use the best rollers and brushes possible and invest in a brush that extends so that you can go from the top of the wall to the bottom in one clean motion.  For real, this will cost you an additional $4.  Do it.
  3. Use Frog Tape.  This stuff is the best.  Apply it as you would any other painter’s tape and to activate the adhesive, run a damp cloth over the tape before you begin painting.  There is a huge difference between Frog Tape and regular painter’s tape.  You will understand the magnitude of that statement after using it for the first time.
  4. To prime or not to prime?  Since the paint I selected was a primer/paint in one, I opted not to prime my walls first.  If I were to do this again, I would definitely still prime the walls even though the guy at the paint store told me I didn’t need to.  I like to think that primer/paint combos are kind of like those shampoo/conditioners in one (does anyone even use those?) and to achieve the best look, you need to keep the two separated.  However, if you are going to prime your walls first, do save yourself some time and ask that they pre-tint the primer (a little tip I learned on YouTube AFTER I already started painting).  If you are painting your walls black, your pre-tinted primer would be some shade of grey instead of white… and painting black over grey is WAY easier than painting black over white.
  5. Now that you’ve moved your furniture out and taped everything off, paint around the edges and any trim as you would normally.  However, do this once with a paint brush and then again with a small roller.  Any discrepancies in texture, thickness and application WILL show, including places where it has been painted with a brush as opposed to a roller.
  6. Paint the remainder of your wall with a roller and work from top to bottom.  You will need more than one coat so make sure your first coat is applied generously.  After applying my first coat in vertical strokes, I applied a second in W strokes (big mistake with black walls) so I applied the third coat in vertical strokes with a roller extender.  LIFE SAVER.  Being able to apply one row from top to bottom in one smooth motion was absolutely key.
  7. If the paint looks uneven while it’s drying [don’t freak out]……….. but………. it’s going to look uneven when it’s dry.  It isn’t going to look as bad when it’s dry, but it won’t even-out a ton when dry as lighter colors seem to do.  Take into consideration how much paint is on your roller more than ever before.  One stroke with medium coverage next to another stroke with slightly more paint on the roller is going to show.  Sorry, but it’s true.  Technique is absolutely key with black paint.
  8. Lastly, don’t take yourself too seriously (unless you are a professional painter).  It is not going to look perfect in every form of light shining from every which angle, but with some patience and practice, it’ll be pretty damn close… and it’ll be worth it!

More pictures to come!  If you have any questions or advice from experience, feel free to comment away 🙂

Design, Interiors Tagged With: black interior, black office, black walls, design, executive office, fashion, interior design, paint, painting, style, wine

Winter Wedding Weekend in Telluride

February 23, 2012

I often have a hard time readjusting after taking a weekend break from this crazy city and our return from Telluride, CO where we witnessed our friends Phillip and Claire marry last weekend was no different.  The couple currently lives in London where Claire is an accomplished interior designer and Phillip is an attorney at a world-renowned firm.  Telluride is a very special place for both of them and I’m so happy to have experienced it for the first time.  Growing up enduring frigid Midwest winters, I could hardly imagine why anyone would ever vacation in a cold place.  After living in Southern California for a few years, however, I can completely understand and traveling to this tiny, snow-covered mountain town of 2,000 was nothing short of enchanting.  Here are a few of my favorite moments from last weekend that make me smile 🙂

{Stunning morning view from our condo}

{Downtown Telluride}

{Taking the gondola up for the first time}

{Gorgeous mountain views in every direction}

{ Rare blog picture of the boyfriend and I… thinking of this day makes me so happy 🙂 }

{The long descent back to Telluride}

{Exploring in the powdery snow}

{LOVED the cozy lodge feel and architecture}

{Refueling at 9545 in Mountain Village thanks to the suggestion of some friendly locals}

{Gorgeous flowers in the reception bar area}

{“Mr. & Mrs.”}

{White and green florals and mercury glass… stunning!}

{Beautiful tablescapes}

{Burlap tablecloths, white china, white florals, silver mercury glass accents… a gorgeous winter wonderland}

{Is there anything in the world better than lobster pastry puffs?!  I mean… come on!}

{Love}

{View from Allred’s at the top of the mountain}

{I’m a sucker for antler chandeliers}

{Delicious post wedding breakfast hangover cure at The Butcher & The Baker}

 {Southwest scramble}

{Gearing up for the looong drive home}

{Perfect AZ desert sunset to end our weekend}

Design, Dine, Floral, Interiors, Life, Travel Tagged With: colorado, design, fashion, flowers, food, snow, Telluride, travel, wedding

Flower Arranging Tutorial

February 15, 2012

After taking a bit of a flower hiatus over the holidays, I was really itching to get back to the Flower Mart and get my hands back to work.  My friend’s February birthday was the perfect excuse so I drove downtown early one morning last week as the sun rose and with my tea in-tow to pick up a bundle of blooms and got to work.  After posting about Katie and Chris last week, I received a few emails asking how I do it – How flattering!  Quite simply, the answer is two fold.  I was raised by the most amazing mother with a green thumb passed down from my Grandfather.  For as long as I can remember, her hands were outside and in the dirt every Saturday and Sunday tending to her garden and she would make the most amazing arrangements.  I learned so much from just watching her, but she’d always share little tricks and secrets with me.  Also, to be quite honest, flower arranging just comes really naturally to me and is really soothing.  I’m amazed at the beautiful things nature creates on its own and I’m overwhelmed with gratitude and joy (even in the stressful moments!) while working with flowers.  It might seem difficult, but thankfully, the steps from fresh-cut blooms to the reward of a gorgeous arrangement are fairly simple… and I’m going to share them in as much detail as possible today.

{From left to right: Succulents, Dusty Miller, Dahlias, Ellington/Korean Fir, Ranunculus, Wheat Grass, Thistle.  Not pictured above: White Hydrangeas}

1.  First and foremost, decide what flowers you’re going to use for your arrangement.  For this one in particular, I was arranging for a friend who likes white flowers so I decided to use white flowers as a base with a lot of textured greens.

2.  Make sure you have everything you’ll need:  Container (and liner if your container is permeable), Oasis Floral Foam (for wet arrangements), flower picks with attached wire, floral tape (if you’re using foam to anchor your arrangements, you’ll almost never need tape, but I always keep it handy), pruners, flowers in fresh water.

3.  Cut your foam to the desired size (a knife works for this so don’t get talked into purchasing a foam cutter).  Make sure the foam fits snuggly in the container as to prevent the arrangement from shifting.   Take the foam out and soak it in a bucket of water until it no longer floats.  To speed up the process, sometimes it helps if you poke a few holes through the middle.

4.  Start with your largest flower (I like to use hydrangeas for this type of arrangement) give them a clean cut on an angle and cut away any leaves.  Place the first stem into the foam at one of the corners.  You want the flower to hang partially over the edge of the container.  Fill in the remaining three corners with hydrangeas and put the fifth hydrangea in the center.  When you are finished, you should still be able to see the foam if you look closely.  Make sure they aren’t packed together too tightly to add your remaining flowers.

5.  Choose your next largest flower, in this case it was the white dahlias.  Place them through (not next to) the hydrangeas and into the foam.  Putting them through the hydrangeas spreads the hydrangea buds apart and makes the arrangement more even and consistent.  You don’t want them to get lost in the hydrangeas so allow them to stick out a tiny bit further.

6.  The next flower I used was the ranunculus.  Since ranunculus have really thin and flimsy stalks (unlike hydrangeas and dahlias) it’s close to impossible to stick them into foam without them breaking.  Cut your ranunculus, bunch two of them together with a bud or two and wrap the wire of the pick around them as far down as you can go.  Clip to the desired length and place them into your arrangement.  Put a few of these little bunches through the hydrangeas and a few next to them to start filling in any gaps.

7.  Now on to the greens!  I used Dusty Miller to start because I absolutely LOVE the soft texture and the silvery hue.  Using the floral picks again, bunch 2-3 leaves together and add them to your arrangement.  Scatter several of these bunches throughout.

8.  Repeat with the white thistle (using the flower picks) since they also have really delicate stems.

9.   The silvery pine cone/artichoke looking greenery I picked up from the Flower Mart was referred to by two different names at different vendors: Ellington and Korean Fir.  I’m still not 100% sure what this is technically called, but it was beautiful and had so much great texture.  I scattered a few about in this arrangement.

10.  Lastly, I added some wheat grass to give the arrangement a soft, feathery look.  Follow the same steps as the ranunculus with a floral pic and scatter them throughout the arrangement.  Don’t push your little bunches too far into the foam, but allow them to stick out a little higher than then rest of the flowers to enhance that texture.

11.  Fill in any remaining space with some leftover flowers and voila!  You’re done!

Things to remember when making this type of arrangement:

–  Start monochromatically and move from lightest to darkest.  I always start with the largest flower (or base flower – in this case it was the hydrangeas) and since these were white, I used all of my white flowers first before moving onto the colored flowers and greens.  This allows you to seamlessly move from light to dark without too much contrast.  In my personal opinion, there is nothing worse than a white arrangement with really dark purple or blue buds and nothing to bridge that transition.  Working from light to dark will allow for a great flow of colors and textures.

–  You don’t necessarily need to use everything you have.  In this case, I picked up a few succulents and willow branches, but once I started arranging, I realized that I really didn’t need them for this particular piece.  Don’t feel obligated to use every single stem you buy.  Do what looks best.

If you feel like you’d still like some more instruction (and are in the LA/OC area) I’m happy to offer a crash course on flower arranging… perhaps one weekend over a few glasses of wine?  😉  Reach out if you’d be interested in something like this.  

HAPPY FLOWERING!

Design, Floral Tagged With: design, fashion, floral, flowers, wedding

Katie + Chris

February 7, 2012

How gorgeous is this couple?!  I had the pleasure of doing Katie and Chris’s wedding flowers last fall after meeting her through our mutual friend Tiffany.  After anxiously awaiting the pictures from their big day (my camera was out of battery day of – worst luck ever!), Katie passed these on to me and I was too excited to wait for another Friday to come for a Friday Flowers post.

Now on to the love story!  The perfect pair met while she was Coxswain on the Long Beach State Crew Team and he was her coach – adorable!  The husband-and-wife-to-be were friends for about 4 years before their romance blossomed and now they both work for Los Alamitos schools – she is a speech language pathologist and he works for the auxiliary department.  For their Dana Point nuptials, Katie wanted to stick with a laid back, rustic, nautical, beachy feel (L-O-V-E) and wanted a fairly simple color palate of white blooms and yellow Billy Balls… one of my favorite combos.  Lucky for me, the bride was just as fun as her style and working with Katie and Chris was an absolute delight 🙂

Florals:
{Bride} O’Hara Roses, White Roses, Ranunculus, Dahlias, Gardenias, Billy Balls
{Boutonnieres} Billy Balls, Dahlia (for the groom)
{Bridesmaids} White Roses, Dahlias, China Mums, Spider Mums, Stock, Billy Balls
{Flower Girls & Flower Ceremony} Gerber Daisies
{Table Arrangements} Hydrangeas, China Mums, Spider Mums, Dahlias, Stock, Billy Balls

Venue: Ocean Institute – Dana Point, CA
Photographer: Mark Brook Photographers

Design, Floral Tagged With: California, fashion, floral, flowers, institute Dana Point, ocean, wedding

J.Crew Christmas or Hanukkah or Whatever…

December 5, 2011

I’m OBSESSED with J.Crew, so if you’re like me, you’ll appreciate this sweet-as-a-sugarplum deal going on today only: 25% off and free shipping on ALL orders.  Just use the code HOLIDAY and get holiday shopping away!  Hint, hint, mom, boyfriend… 😉

LOVE it.
Favorite wardrobe staple.
Yes please.
Alright, alright a little much, but swoon!
Perfectly pretty and preppy.
Too much beauty to choose!

Stay tuned for some swell holiday gift guides… coming soon!  Xo

Design Tagged With: christmas, deals, fashion, hanukkah, jcrew, shopping

My Kind of Color

December 2, 2011

Confession: I’ve never once dyed my hair (unless you consider gold hair mascara in 8th grade “dyeing”) and up until a year ago, I absolutely despised painting my nails.  I’m convinced the combination of these two characteristics means I’m a pretty low maintenance girl.  “Haha,” says the boyfriend 😉  Truth be told, after a decade of having a ballet teacher tell you not to even think about a pedicure for fear of having your painfully earned point shoe calluses scraped off your feet, I didn’t even have a professional pedi until a few years back.  I know, I know… GROSS.  I don’t even want to know what my Thai manicurist might have been saying about my feet.  That being said, I’m kind of a late bloomer in the nail upkeep department and I’m terrible at picking out nail colors to suit my skin tone.  That all changed when I randomly and reluctantly toted home Mink Muffs by Essie on a CVS run last month.  The color is absolutely gorgeous on and I’ve since seen several LA ladies flawlessly sporting it around town.  I’m convinced it’s as close to a universal color as possible in the nail world and it looks just fabulous on everyone.

Essie Mink Muffs: Buy your own bottle here.

Design Tagged With: fashion, nail polish

Always a Dreamer

August 26, 2011

Before I had even finished undergrad, hit the streets of Hollywood, had my heart crushed a few times, landed a job at an (about-to-undergo-a-ruthless-merger) talent agency, co-founded a fashion tape company and wound up in design school… before all of that (and some Photoshop classes), there was Polyvore.  I recently stumbled upon an interiors blog whose author had created a number of “sets” using Polyvore and the memory floodgates came rushing open.  I had completely forgotten about Polyvore (as well as my username/password) so it took a while to finagle my way back into my account, but voila!  I finally did it!  I hadn’t logged in, in three years, so it was definitely a trip down memory lane and interesting to see not only how my style has evolved, but what I was experiencing emotionally as a 20 year old on the cusp of graduation and grappling with what path to take toward my career. Polyvore interiors didn’t exist at the time I was creating these, but I’ll have to check it out now as a quicker alternative to Photoshop and Illustrator.  While the below have nothing to do with interior/floral design, I just had to share a few of my favorites.  You can take a look at the rest of my (some cute and some obnoxious) sets here.

Dreamer

Summer FunCool Chick

Design Tagged With: design, fashion, polyvore

  • Facebook
  • Instagram
  • Pinterest

Search

About Meg

subscribe via email

Insta Love

Shop Pillows!

Recent

  • Late Summer Gazpacho
  • 2018 Harvest Party
  • Life Lately: Golden Hour
  • Sauvignon Blanc Harvest / 2017
  • Fig + Prosciutto Salad with Almond Milk Ricotta

Favorites

Follow Along!

  • Facebook
  • Instagram
  • Pinterest

© Copyright 2025. Design.Wine.Dine.. All Rights Reserved. Design by Bloom.