Design.Wine.Dine.

  • About
  • Design
    • Interiors
    • Events
    • Floral
  • Wine
    • Cocktails
  • Dine
    • Fall
  • Life
  • Travel
  • Contact
  • Facebook
  • Instagram
  • Pinterest

Weekend Project – Patio Garden

October 25, 2013

Last weekend, after returning home from New York, I was really adamant to finish something.  I’ve got a list of DIYs coming out of my ears, but really wanted to get one done, on the books and out-of-the-way.  Enter… our outdoor space.  When viewing our place for the first time, I was THRILLED when I stepped outside and my question of “oh, so this is a shared space?” was answered with “no, this would be all yours”.  Literally, you guys.  I was shaking with excitement.  I couldn’t get Jake on the phone fast enough.  I am obsessed with gardening (thanks to my mom for that gene) and I take no shame in enlisting friends to care for my little green kids as much as they do for Lily whenever I’m away.  Having a space that was so much bigger than ever before to create my own little garden by the beach?!  YES please.  Thankfully, after borderline stalking our now landlord, we got the apartment and I couldn’t wait to go to town.  We have a patio directly off of our bedroom as well as yard (glorified patio – not pictured) up some steps and behind our duplex.  Sold.  However, said patio was hideous when we moved in. HID.E.OUS.  Enter exhibit A:

IMG_0204

I told you.  Steps that needed to be stained, some RANDOM paint job going on there with a mixture of white and beige… But she had potential!  It was SPACE.  Real, live outdoor space of our very own that could be transformed into whatever we’d like.  The first thing on the list was to figure out what in the heck to do with the cinderblock walls.  Paint them?  Ideally, I wanted it to be a living wall to wake up next to (all Cameron Diaz like in The Holiday with electronic blinds that open with the sun shining in), but that seemed like a pretty lofty goal for a rental.  So, we needed to think of something else.  While running into Ikea one day for heavens knows what, I stumbled across the Applaro Outdoor Panel and knew I’d found a solution.  I figured out how many we’d need, bought them and since we got carried away with unpacking, traveling for work and life in general, there they sat until last weekend.  And then, finally came my little garden.

If you’re in a situation like us, here is what you need to create your OWN apartment garden with roughly $150.

Supplies

Ikea Applaro Outdoor Panel – Pot hooks included (3) $39
Ikea Socker pots (8) $0.79
Ikea white pots (2) $10.99 (no longer available online, but next size up here)
Masonry anchors + Bit $7
Total: $152.30

I already had most of the plants and the lanterns, as well as a drill and a level to make this all come to life, but factor in another $100 if you’re starting fresh.

Step 1: Hardware – I knew I was going to need a masonry bit as well as concrete anchors so I was able to find a package that included both the anchors and the right size bit to drill pilot holes for the anchors.  I bought some longer anchors too just in case the 1.25″ anchors were too short so that I wouldn’t have to run back out to the hardware store.

IMG_0208

Step 2: Place wall panels where you want them and make sure they’re level.  Since I was doing this by myself and since the panels were going to be resting on uneven brick pavers, this was honestly the hardest part.

IMG_0210

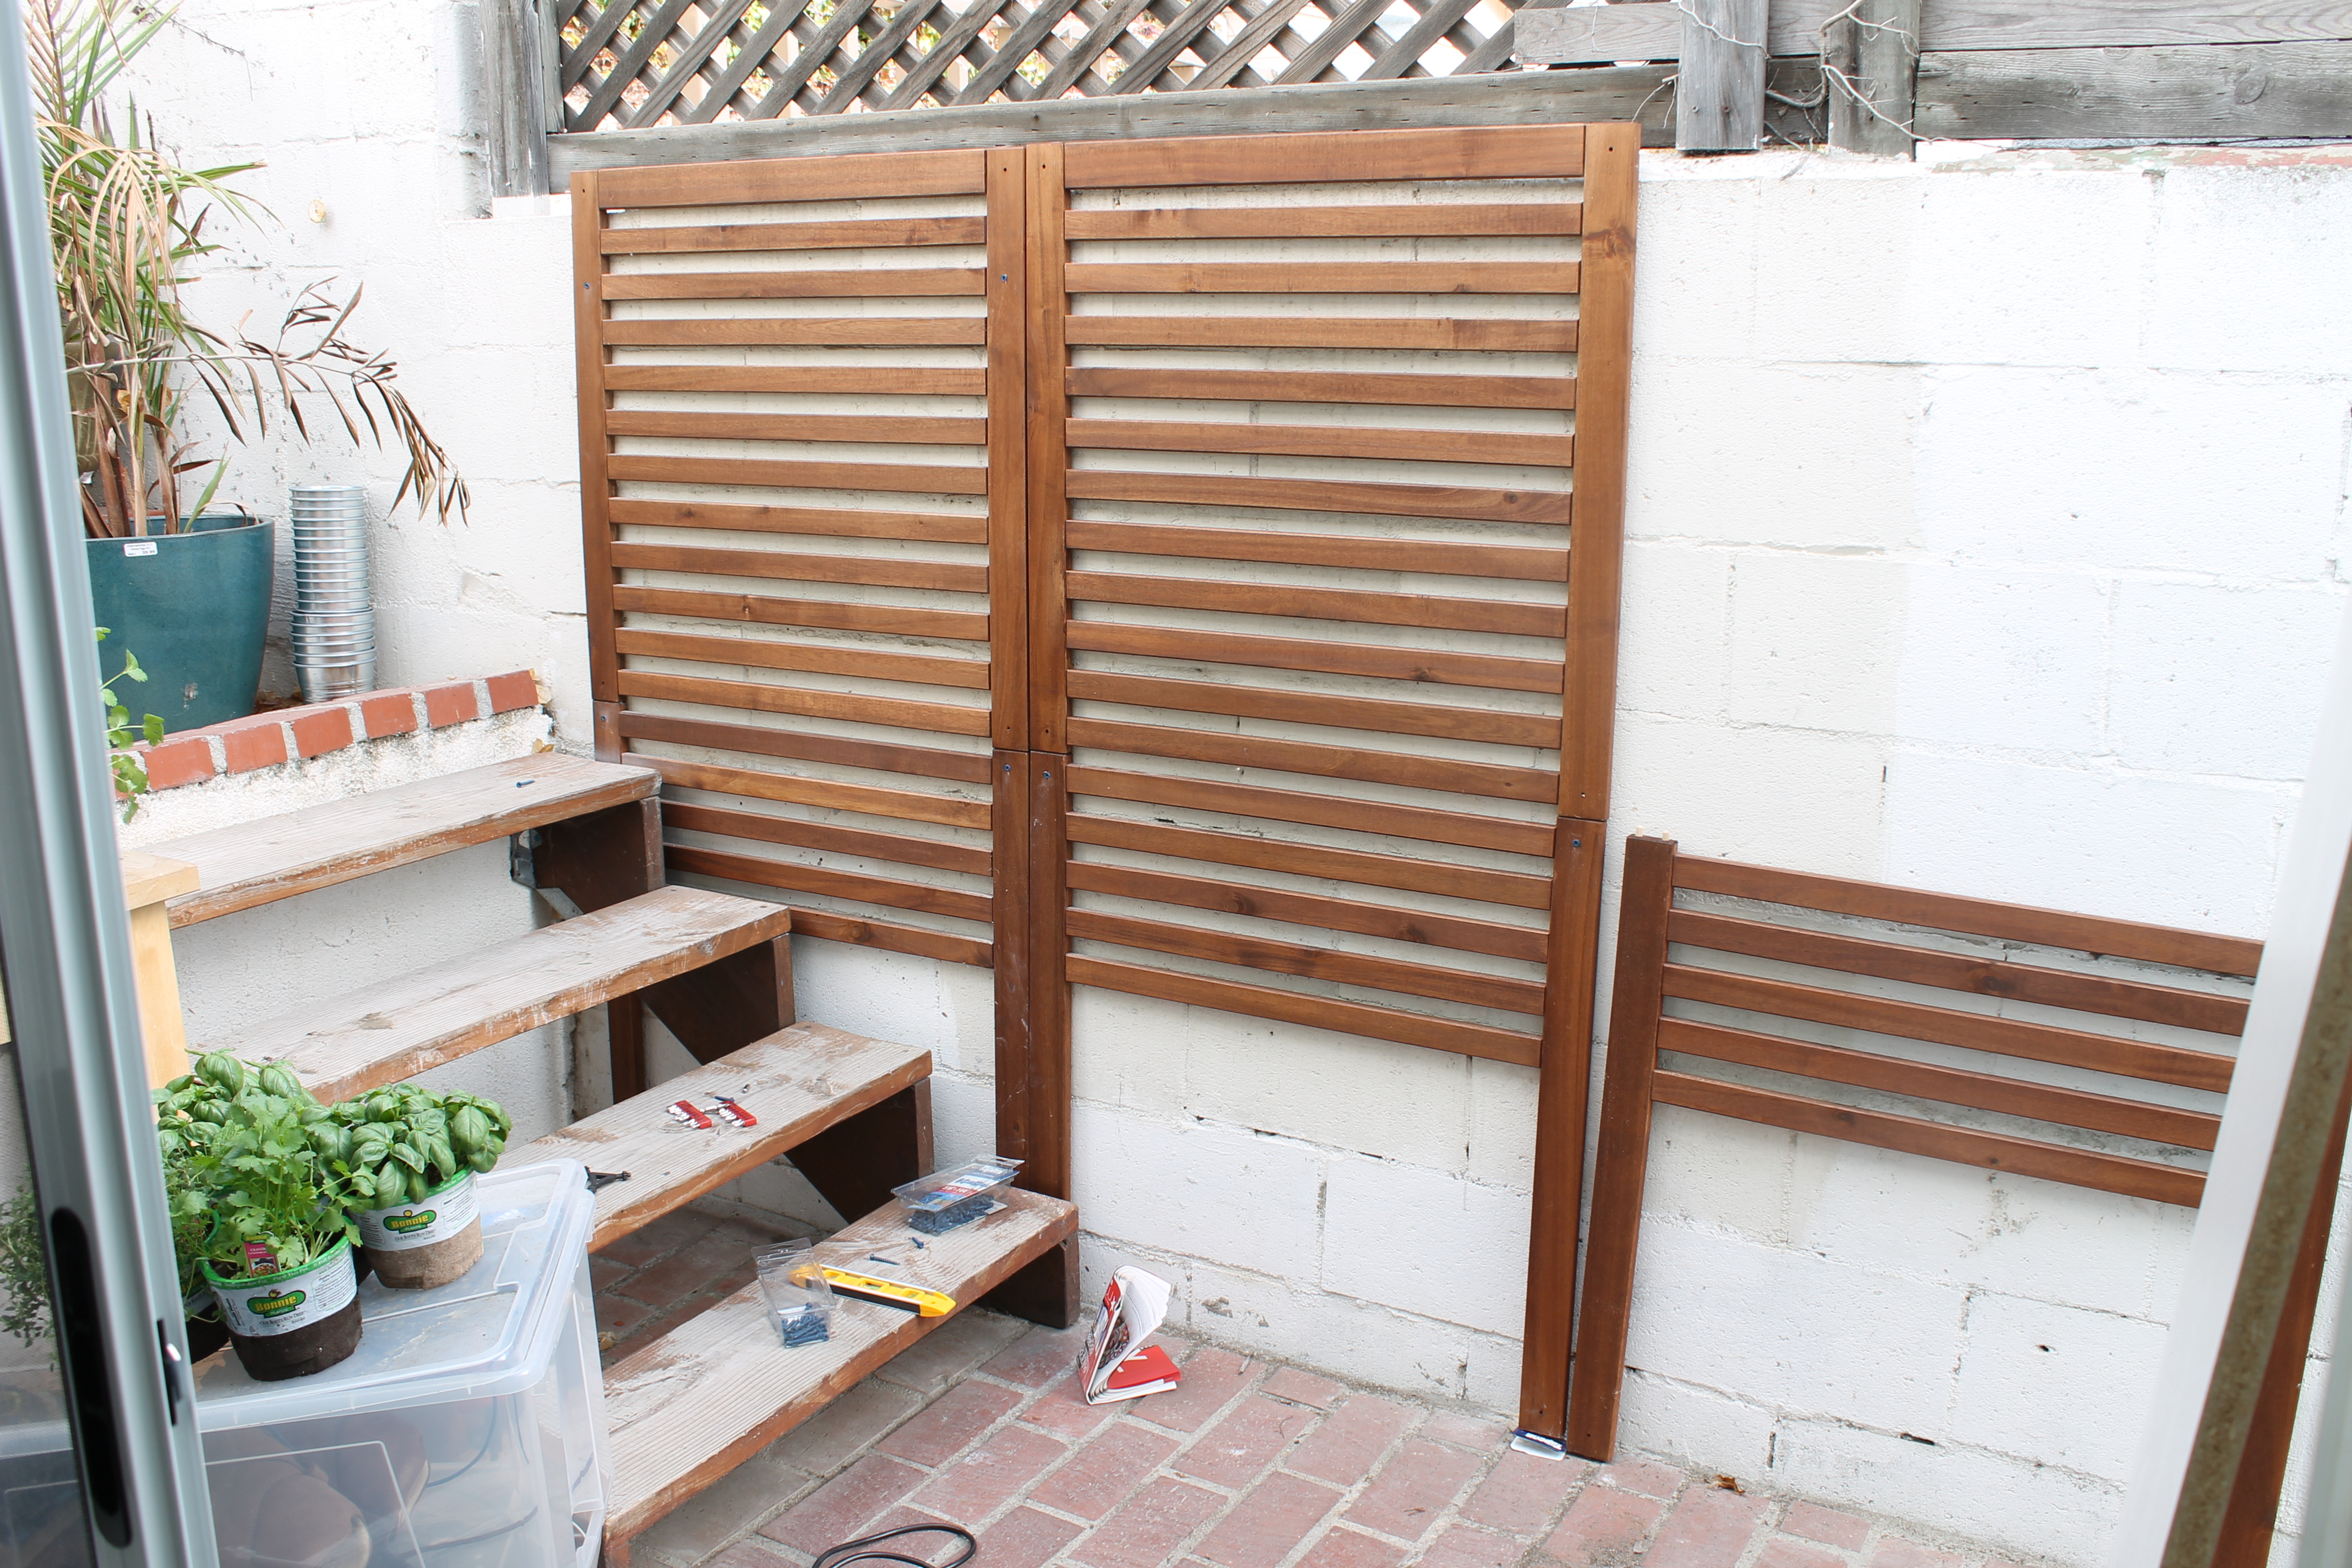
Step 3: Drill your pilot holes and screw in anchors to attach your panel.  This is pretty self-explanatory, but just make sure that you stop every once in a while to give your drill a rest.  I have a pretty inexpensive drill and while it’s amazing for the price, drilling through concrete/cinderblock is entirely different from wood or anything else I’ve ever done in the past.  And for the love of god, be CAREFUL when removing your bit.  It was SO hot from the friction and of course I wasn’t wearing gloves (idiot) and burned my fingers.  I’m fine, but that was no fun.

IMG_0213

Repeat until all panels are attached!  YAY!  Minus all of the crap to the left, the space is already starting to look so much better!  Now, time for the pots.  I decided to use the Socker pots from Ikea because a) they’re inexpensive b) they’re cute and c) they’re the perfect size for herbs and that is what was going in them.  However, they don’t have holes in the bottom for drainage or for hanging them on the hooks so you have to drill those manually.  Just make sure you use a bit suitable for metal.

IMG_0215

Step 4: Put your little plants in the pots and hang on your wall!  You’re almost done!

IMG_0217

Step 5: Dress up the weird empty bottom area without rungs with plants, lanterns, candles, pumpkins if it’s October… get creative!  Or, if you have the space, Ikea sells a storage bench that can attach to the wall panels.

IMG_0221

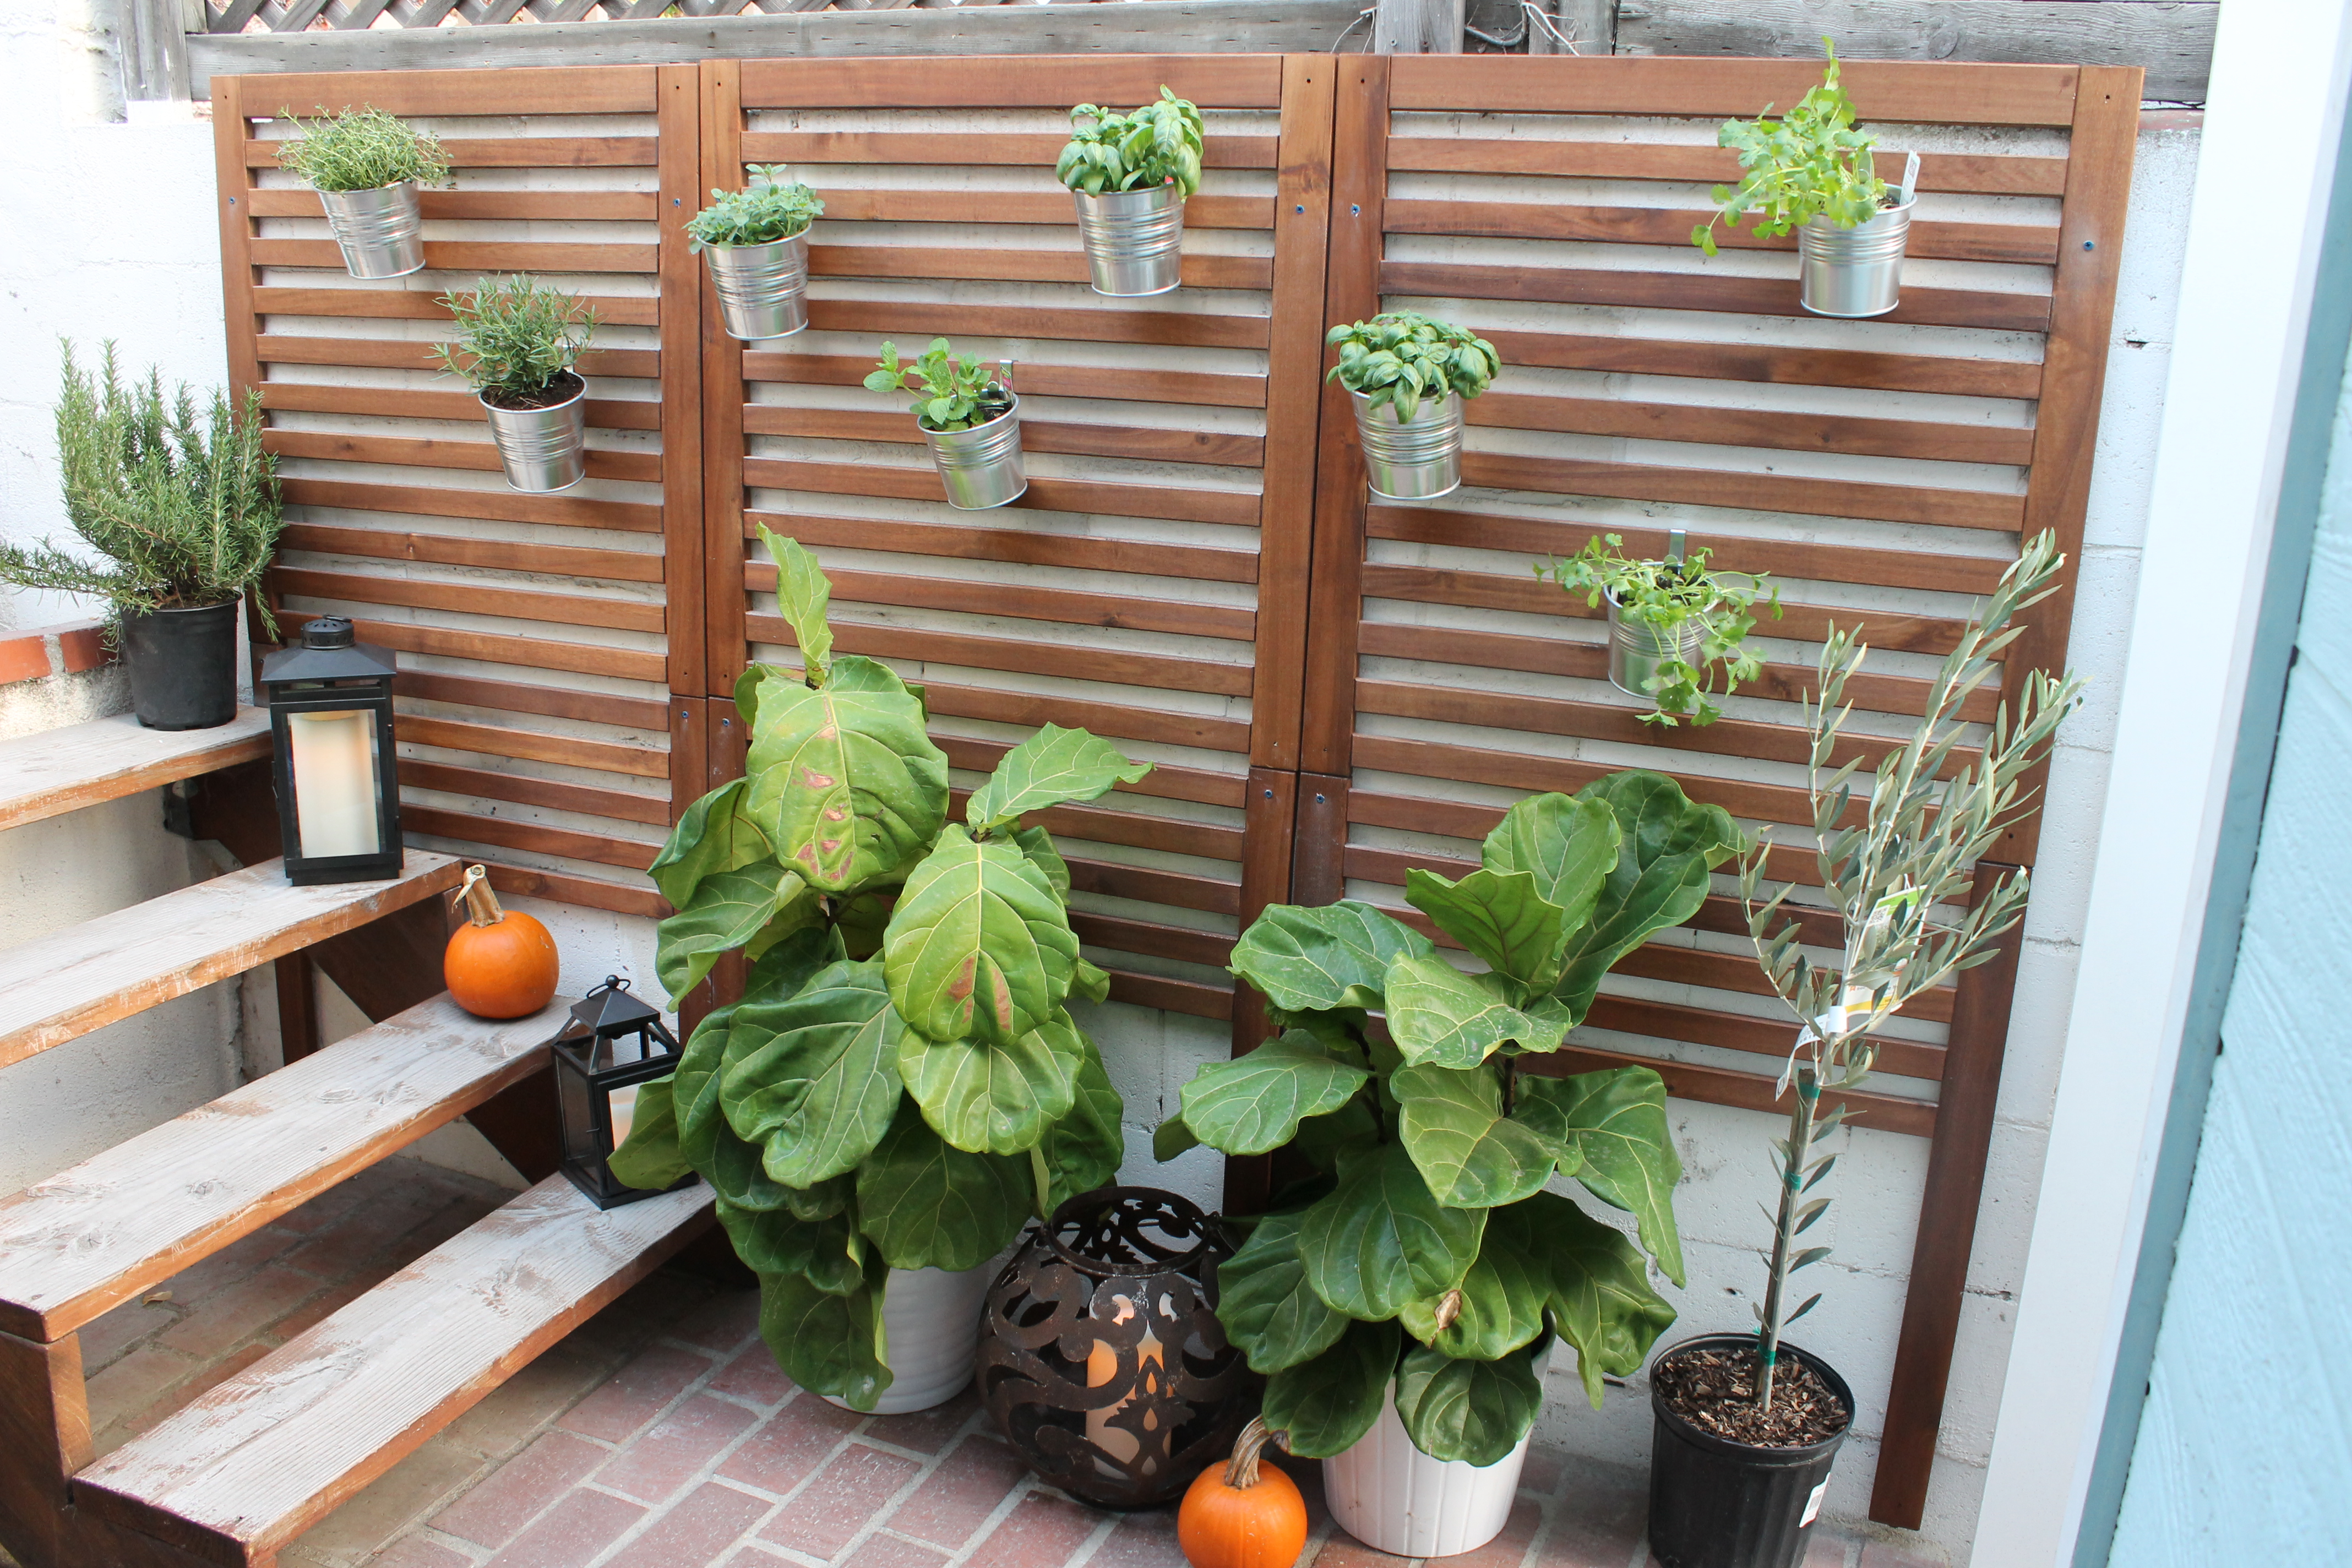
Tadaaaa!  I still need to re-pot the larger rosemary plant as well as the olive tree AND re-stain those darn steps, but I think she’s looking pretty cute for just a few hours of work.

And for good time’s sake… before and after!

Before After Garden

Design, Floral, Interiors Tagged With: apartment, DIY, garden, gardening, home, house, Ikea, life, living, outdoor space, tutorial

High Low: Gilt Mirror

October 17, 2013

Gilt-Mirrors

While scanning the pages of Domino, I was FLOORED when I landed on the above vignette.  From the herringbone wood flooring, to the original fireplace and gorgeous ceiling detail – I could not take my eyes off of it.  The focal point of the room however, is the beautiful gilt mirror with its elegantly rounded corners and perfect patina.  It adds such an incredible richness to the space that plays off of the luxurious, gold tones in the floor and the brass lighting above the book shelves.

My boyfriend and I just moved into a new little apartment (more on that later) and I’m learning first hand what a tremendous impact adding mirrors can make.  It’s amazing how such a simple addition can draw your eye up, brighten up a space and make it appear so much larger than it actually is.  You almost don’t notice that the above room is pretty tiny, with room for just two chairs and a small table.  I also couldn’t help but note that I’ve been seeing this classic French mirror EVERYWHERE these days and being that the above version was $1,300 – now reduced to $1,088 (still yikes!), I sought out to find another alternative.  Enter the French Gilt Mirror from Wisteria at a whopping $700+ less.  Success!  Adding that to my wish list 😉

High-Low_Gilt-Mirror

Design, Interiors Tagged With: Architecture, design, gilt, gold, home, interior design, interiors

DOMINO

October 14, 2013

o_52278c4e9ac35fe0693b0bcd

Two weekends ago, I was standing in line at the Whole Foods in Austin, TX, when I saw the latest edition of Domino.  I assumed it was just one of their special editions where they recycle content from past issues (which I would have purchased regardless), but I literally screamed when I flipped open the cover and discovered that Domino was back – for real.   I was so psychotically anxiously excited that I had to pull myself together and figure out how to formulate a comprehendible sentence to explain to my co-worker that this was just the best thing to ever happen.  Seriously.  Ever.  Design publications come and go with a feature or two that are tear outs/keepers, but I have never thrown away an issue of Domino.  They never get old, never seem stuffy or outdated… just excellent, solid, classic design and delightfully inspirational – always.

In their first formal issue back, they visited the home of Manhattan restauranteur, Ali Cayne of Haven’s Kitchen, which I have been dying to see.  The goal behind Haven’s Kitchen is to create a food community of sorts where people can sign up for classes (without the need to enroll in full blown culinary school) cook together, learn and gain an understanding of the importance of locally grown and sustainable foods.  I’m so in love with their vision (you can learn more here) and their space is literally ONE BLOCK from where I’m staying in NY…… I think a visit is in order.  In the interim, take a moment to bask in all of the beauty of Ali’s insanely gorgeous West Village townhouse and check out the full line up and feature in Domino here.

o_52278c429ac35f50600b5864-2

{the most perfect floors – ever}

o_52278c4f9ac35fd26ace6f79

{effortlessly chic gallery wall}

o_52278c429ac35ff86be1af77

o_52278c449ac35f065d60706b-1

{jaw dropping}

o_52278c459ac35f2b7038bca6

o_52278c489ac35fd86bca064b

{subway tile, open shelving, brass fixtures, the creme de la creme range and hood… and a pot filler.  is there anything wrong with this kitchen?! no you’re right, there’s not}

o_52278c509ac35f2a671697bc

o_52278c499ac35f19675b02dd

{kthanks for letting me take a bath here forever}

o_52278c589ac35feb6db9b039

{two words: gilt mirrors}

Design, Interiors Tagged With: Architecture, design, domino, interior design, New york, nyc, west village

Do work, son!

October 8, 2013

817f5e21d4455f95ac259b3ebd5371cc

I’m sorry, but did someone say it’s OCTOBER?!  Where has this year gone??  2013 has been so busy, frustrating, rewarding, exhausting and completely all consuming, but I miss blogging so much that I absolutely must make the time for it.  I’m a firm believer that if you aren’t doing what you love, than you might as well be doing nothing at all… I LOVE this little creative outlet of mine and it’s time that I start showing up here every once in a while.  My goal is to post every few days (even if it’s just a short snippet, update or something currently inspiring) and see where it takes me, but I can’t wait to hang out with you again 🙂

image via


Design, Interiors, Life Tagged With: blog, blogging, late, lately, life, love

Holiday Happenings

December 4, 2012

The week leading up to Thanksgiving through New Years Day make up my absolute favorite time of the year.  From the anticipation of time with family and friends to delicious food and Christmas music, there is a feeling in the air that is just electric.  The past week has been a busy one, but full of productivity and a few of my favorite holiday traditions.

Weekly_ChristmasJPG


  • My absolute favorite stationary company ever, Rifle Paper Co. had an amazing Cyber Monday deal that I took full advantage of.  We ordered some holiday cards and gift tags for my boyfriend’s annual holiday corporate gifting… but I seriously might have to sneak a few!  How adorable are they?!
  • Gorgeous Friday night sunset from our rooftop balcony at work.  Perfect ending to the week.
  • I’ve been dying to put our Christmas tree up since before Thanksgiving, but it finally happened over the weekend.
  • There she is!  All decorated.  More pictures to come 🙂
  • I know I’ve openly complained about this in the past, but our apartment has ONE (yes, ONE) closet and a tiny pantry.  Our old console table, just wasn’t cutting it and we really needed something that would allow for more storage so that we could use our minuscule make-shift pantry for what else?  Food.  I finally caved and bought an Ikea Malm in white and intend on decking it out in Overlays.  Definitely a project for a rainy winter weekend and I can’t wait.  For now, she’s a little plain Jane, but I couldn’t be happier to have a pantry that stores food instead of vases, crafts and cleaning supplies.  Plus, a white table instead of black really lightens up the hallway 🙂
  • And finally… our ONEHOPE Coffee has arrived!  We were like a bunch of kids on Christmas morning waiting as our President cut open the box and pulled out the bags for us to see.  What a wonderful Tuesday treat!

Design, Interiors, Life Tagged With: christmas, christmas food, christmas tree, coffee, console table, family, stationary, sunset, wine

The Hardest Thing I’ve Ever Done In My Life: Paint Walls Black

November 28, 2012

No joke, people!  Painting walls black should be left strictly to the professionals 😉 But being that I had a budget for paint, supplies and nothing beyond that, I had to make do and painted our office black myself.  If you are going to embark on such a task, here are a few tips to follow (please feel free to comment with any others you might have).

  1. First and foremost, reconsider doing this yourself.  Sorry, but I have to say it.  Unless you are one of the few who find taping off a wall, painting and then repainting at least 1-3 more times therapeutic in some way, really reevaluate your budget and see if there is room to hire a painter.  You will not regret it.
  2. If you decide to move forward, buy only the best paint and supplies.  This is an absolute MUST.  Buy only the best grade of paint.  In my case it was Aura by Benjamin Moore (~$60/gallon) and thank GOD I went with this one (more on that later).  Additionally, use the best rollers and brushes possible and invest in a brush that extends so that you can go from the top of the wall to the bottom in one clean motion.  For real, this will cost you an additional $4.  Do it.
  3. Use Frog Tape.  This stuff is the best.  Apply it as you would any other painter’s tape and to activate the adhesive, run a damp cloth over the tape before you begin painting.  There is a huge difference between Frog Tape and regular painter’s tape.  You will understand the magnitude of that statement after using it for the first time.
  4. To prime or not to prime?  Since the paint I selected was a primer/paint in one, I opted not to prime my walls first.  If I were to do this again, I would definitely still prime the walls even though the guy at the paint store told me I didn’t need to.  I like to think that primer/paint combos are kind of like those shampoo/conditioners in one (does anyone even use those?) and to achieve the best look, you need to keep the two separated.  However, if you are going to prime your walls first, do save yourself some time and ask that they pre-tint the primer (a little tip I learned on YouTube AFTER I already started painting).  If you are painting your walls black, your pre-tinted primer would be some shade of grey instead of white… and painting black over grey is WAY easier than painting black over white.
  5. Now that you’ve moved your furniture out and taped everything off, paint around the edges and any trim as you would normally.  However, do this once with a paint brush and then again with a small roller.  Any discrepancies in texture, thickness and application WILL show, including places where it has been painted with a brush as opposed to a roller.
  6. Paint the remainder of your wall with a roller and work from top to bottom.  You will need more than one coat so make sure your first coat is applied generously.  After applying my first coat in vertical strokes, I applied a second in W strokes (big mistake with black walls) so I applied the third coat in vertical strokes with a roller extender.  LIFE SAVER.  Being able to apply one row from top to bottom in one smooth motion was absolutely key.
  7. If the paint looks uneven while it’s drying [don’t freak out]……….. but………. it’s going to look uneven when it’s dry.  It isn’t going to look as bad when it’s dry, but it won’t even-out a ton when dry as lighter colors seem to do.  Take into consideration how much paint is on your roller more than ever before.  One stroke with medium coverage next to another stroke with slightly more paint on the roller is going to show.  Sorry, but it’s true.  Technique is absolutely key with black paint.
  8. Lastly, don’t take yourself too seriously (unless you are a professional painter).  It is not going to look perfect in every form of light shining from every which angle, but with some patience and practice, it’ll be pretty damn close… and it’ll be worth it!

More pictures to come!  If you have any questions or advice from experience, feel free to comment away 🙂

Design, Interiors Tagged With: black interior, black office, black walls, design, executive office, fashion, interior design, paint, painting, style, wine

Oh Monday!

November 19, 2012

The weekend was completely insane!  I painted, prepped for our company’s Thanksgiving dinner, painted again, went to an event and then painted some more.  I can not believe it’s Monday already… where was my weekend?!  On a lighter note, here’s a sneak peek of our #HOPEgiving dinner (follow us on Instagram and Twitter) tablescape.  I ran to the flower mart this morning and snatched up the last of the peonies along with some vibrant tulips, pin cushions and coffee beans.  LOVE.  The colors were just the warm yet modern punch of color we needed and I’m dying over the gold vessels, tapers, chargers and votives I was able to find over the weekend.  My vision came to life 🙂  More details to follow!  Hope you’re having a great Monday!

Design, Dine, Floral, Interiors Tagged With: coffee beans, flowers, gold, julep cup, peonies, thanksgiving

Thanksgiving Table Inspiration

November 16, 2012

When I came across this Thanksgiving table post on Camille Styles last week, I just about fell out of my chair.  I was floored by the chic, sophisticated and modern approach to Thanksgiving decor that McKenzie Powell took instead of the traditional, heavy Thanksgiving tablescapes that come to mind when I envision the holiday.  The gorgeous fall florals and orange tapers are just enough to keep the table warm and inviting, while the glass candlesticks, geometric napkins and hint of gold keep the look fresh and modern.  Bravo!  Our team is celebrating Thanksgiving together next Monday and here is my inspiration board for our own table modeled after McKenzie’s rendition (with my own little twist) of course 🙂


  • Vibrant fall florals arranged by yours truly as seen here.
  • Glass candlesticks from CB2.
  • Obsessed with this gorgeous (and massive) wishbone.  LOVE!
  • Gold rimmed glassware.  Swoon!
  • Gold chargers beneath modern white china.
  • Greek key fabric for napkins.
  • Love these gold mercury glass votives from one of my favorite sources – Jayson Home.

What will your Thanksgiving table look like?

Design, Dine, Floral, Interiors Tagged With: candlestick, chargers, design, event design, fabric, fall florals, flowers, interior design, mercury glass, table linens, tablescape, thanksgiving, votives, wine glasses, wishbone

My Life in Pictures

November 14, 2012

  • Came across a picture I took last week of this amazing winter wonderland tablescape at Wildflower Linen.  Definitely got me excited for holiday decor!
  • Serious packaging envy!  A case of Sea Smoke was delivered to the office today and I could not believe how gorgeous their shipper and wine inserts were.  Talk about customer experience!  I think we have a little catching up to do 😉
  • Picked up a few (ok, like 30) paint chips on my way home from the office tonight.  I’m feelin’ Benjamin Moore’s Black Ink now… what do you think?
  • An impulse trip my favorite meat market on earth greeted me with this view.  One of those “pinch me, I really live here” moments.
  • Finally home from the office, shooting out a few more emails (or trying to) with my little one by my side.  She likes to take over the keyboard  =^. .^=

Hope you’re having a great week!

Design, Interiors, Life, Wine Tagged With: benjamin moore, California, cat, computer, design, event, interior design, kitten, life, office, paint, paint chips, palm tree, party, sunset, wine, work

Executive Office – Paint it Black

November 13, 2012

After posting about our office yesterday, I got a few concerned comments (primarily from my mother) about my decision to paint our executive space off-black.  “Are you sure you want to do that?  You do realize that black is one of the hardest colors to paint… right?  What if you hate it and want to paint it back?  Do you know how hard that will be?”  Not going to lie, I panicked for a moment and jumped back on Pinterest at the first chance I got.  True to my stubborn self, after taking a 10 minute break to re-evaluate the images of black offices I’ve been stalking collecting, I decided to move forward with off-black plan.  Tomorrow I’m picking up paint chips to make a final decision on the exact hue and we’ll finally get this show on the road.

{This space, designed by Atmosphere Interiors is so beautiful that it warrants three pictures.  Those walls definitely aren’t painted (I’m certain it’s a wallpaper – not paint/stencil), but the black, white and gold are so gorgeous together I could die}

{The lamps. The mirror. The chair… GAH!}

{Simply perfect}

{Check out this stunner by Amy Morris for the Atlanta Homes and Lifestyle show house.  Black, gold, lucite, cognac leather… and that fixture!!!  Done and done}

{From the home of Adam Straus as seen in Lonny Mag.  Pretty much obsessed on every level here…}

{Not as formal – love the integration of the wood and textures of the roman shades.  Perfection featured in Lonny}

After doing some extensive research on rooms with black walls, there are two primary things you need to have in order for the space to succeed:  Great architecture and a ton of light.  Being that this space is a glassed-in loft (with two whole walls of glass, leaving only two to be painted), I’m certain that we have both of the above.  The architecture of our office space is gorgeous (pictures to come soon) and being that daylight enters from both the east and west glass walls, we have plenty of light to keep the space from feeling cramped.  I can’t wait for it to be done 🙂

Design, Interiors Tagged With: black, design, elegant, gold, interior, interior design, lucite, office

  • « Previous Page
  • 1
  • 2
  • 3
  • 4
  • 5
  • …
  • 7
  • Next Page »
  • Facebook
  • Instagram
  • Pinterest

Search

About Meg

subscribe via email

Insta Love

Shop Pillows!

Recent

  • Late Summer Gazpacho
  • 2018 Harvest Party
  • Life Lately: Golden Hour
  • Sauvignon Blanc Harvest / 2017
  • Fig + Prosciutto Salad with Almond Milk Ricotta

Favorites

Follow Along!

  • Facebook
  • Instagram
  • Pinterest

© Copyright 2025. Design.Wine.Dine.. All Rights Reserved. Design by Bloom.